

Temporary Unemployment - Online Service
Before you start
The expression ‘temporarily unemployed’ means that the employee is bound by an employment contract of which the performance has temporarily been suspended, in whole or in part’.
The Temporary Unemployment online service allows employers to:
- apply for temporary unemployment for one or more employee(s);
- consult the decision taken by the NEO.
Communications relating to temporary unemployment must be sent electronically, via the online service available on the portal of social security website or via batch channel. More information about the batch channel can be found in the TechLib section.
Each decision letter is available in PDF format the day following the decision taken by the NEO.
If the decision is positive, the employee can claim unemployment benefits as a temporarily unemployed person.
For more information please consult the site Electronic communication of temporary unemployment on the ONEM-website (in French).
Log in to the social security website
Are you an employer or representative and do you use the social security online services for the first time to apply for temporary unemployment? In this case you have to register first to get access to our online services. Please consult the page ‘My company is registered as employer at the NSSO (in French).
Do you have a problem with or question about your registration? You can reach the Social Security Contact Centre via the contact form.
/!\ Renewal of temporary unemployment online services
The National Employment Office (NEO) is currently modernizing its online services for reporting temporary unemployment. More info can be found here: l'ONEM modernise les applications pour communiquer le chômage temporaire .
As soon as you’ve registered, you can submit an electronic temporary unemployment communication to the NEO. Please click on the blue button ‘Introduce temporary unemployment’ on the page Temporary Unemployment (in French)
To set up a temporary unemployment scheme, you have to complete a number of formalities.
In the following cases, you have to send a communication to the NEO:
- Introduction of a temporary unemployment scheme due to a lack of work resulting from economic causes.
- Introduction of a temporary unemployment scheme due to technical accidents.
- In the event of temporary unemployment due to bad weather, a communication must be send on the first day of the month in which the employee is unemployed.
- In the event of temporary unemployment due to a lack of work resulting from economic causes, a communication must be sent on the first day of the month in which the employee is unemployed.
- In the event of temporary unemployment due to a technical accident, a communication must be send on the first day of the month in which the employee is unemployed.
- In the event of temporary unemployment being the direct or indirect consequence of a strike or lock-out.
- In the event of temporary unemployment being the direct consequence of a force majeure.
For more information, please visit the NEO website (in French).
Log in
Once you have opened the page ‘Chômage temporaire’ (temporary unemployment) of the Social Security website, click on the button ‘Introduire chômage temporaire’ (submit temporary unemployment) on the right side of the screen.
On the screen that opens, you will see the different digital keys to log in.
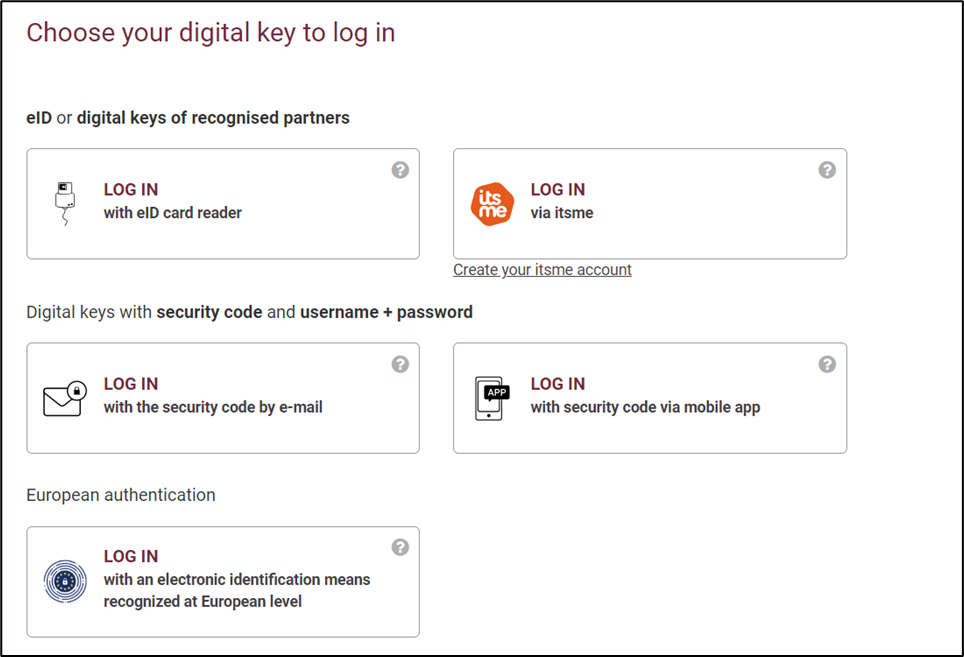
Choose your means of identification.
Employer identification
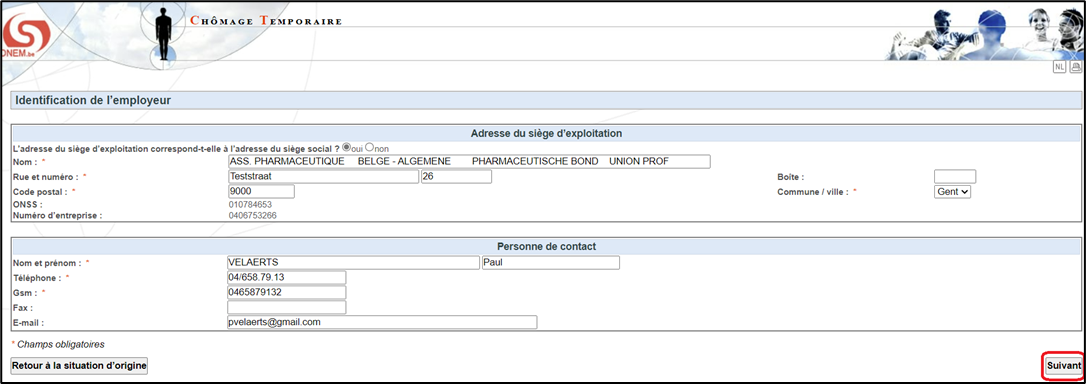
On the page ‘Identification de l’employeur’ (employer identification), please check the following:
Are the branch and head office located at the same address?
- If ‘oui’ (yes), the fields will be completed automatically .
- If ‘non’ (no), please complete the different zones.
Then click on ‘Suivant’ (next).
Choosing the type of temporary unemployment:

Choose the type of temporary unemployment from the list:
- ‘Chômage temporaire prévu pour raisons économiques’ (temporary unemployment due to economic reasons);
- ‘Chômage temporaire pour intémperies (temporary unemployment due to bad weather);
- ‘Chômage temporaire pour accident technique’ (temporary unemployment due to a technical accident;
- ‘Chômage temporaire pour force majeure (pas pour des raisons médicales)’ (temporary unemployment due to force majeur (not for medical reasons));
- ‘Premier jour de Chômage effectif’ (the first actual day of unemployment);
- ‘Chômage temporaire pour cause d’action sociale’ (temporary unemployment due to a strike).
Temporary unemployment due to economic reasons
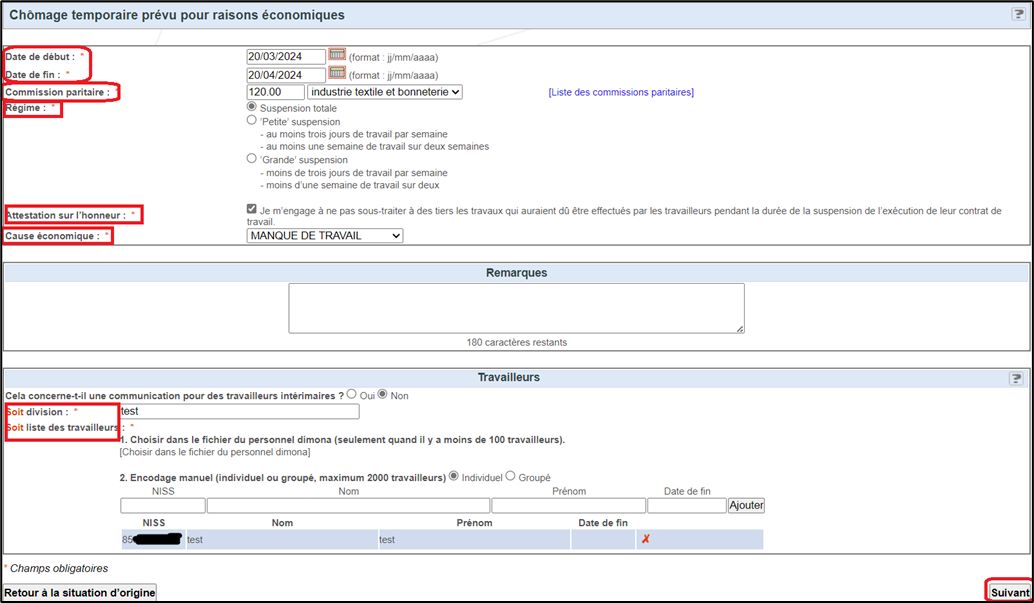
In the field ‘Travailleurs’ (employees) the employer has to fill in information about the employees who are temporarily unemployed. First of all, he needs to specify whether the communication is being filled for temporary employees.
- Enter the start and end dates in the fields ‘Date de début’ (start date) and ‘Date de fin’ (end date) (for assistance, please click on the calendar).
- Enter the joint committee in the field ‘Commission paritaire’ (joint committee) and choose the level from the drop-down menu.
- Choose the type of suspension from the field ‘Régime’ (suspension).
- Tick the field ‘Attestation sur l’honneur’ (sworn statement).
- Choose the economic reason from the drop-down menu ‘Cause économique’ (economic reason).
- Specify the division if a whole division is temporarily unemployed in the field ‘Soit division’ (either division) or click on the list of employees from your own DIMONA-personnel file or enter each concerned employee manually and click on ‘Ajouter’ (add).
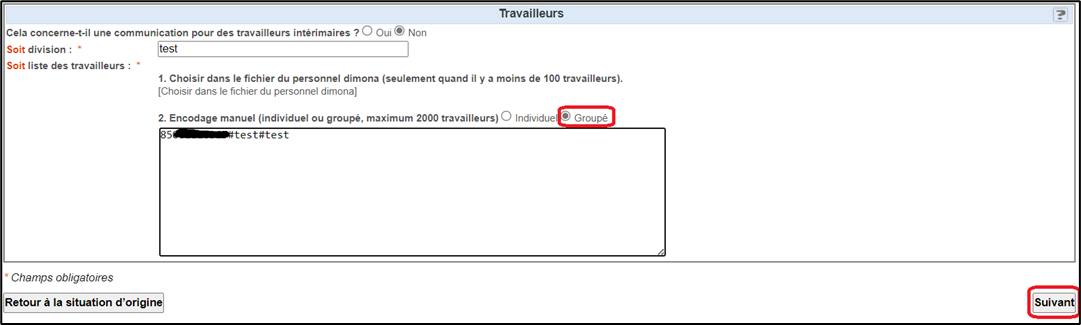
In case of manual and grouped choice of encoding, the employer can copy/paste a list of employees from different files: Excel, Word, Notepad or a WordPad. The following format must be followed: NISS (Social security identification number)#NAME#FIRSTNAME
Once all employees concerned are entered, click on ‘Suivant’ (next).
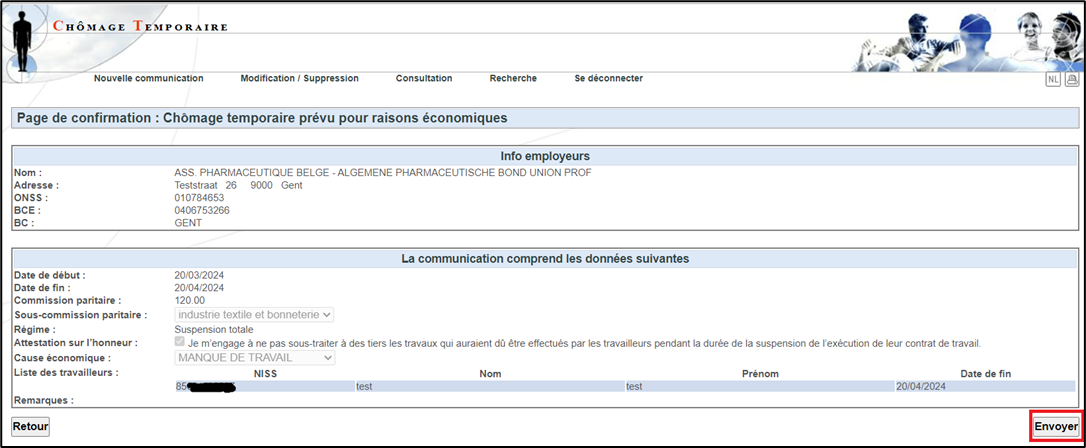
Check if the information entered is correct and click on ‘Envoyer’ (send).
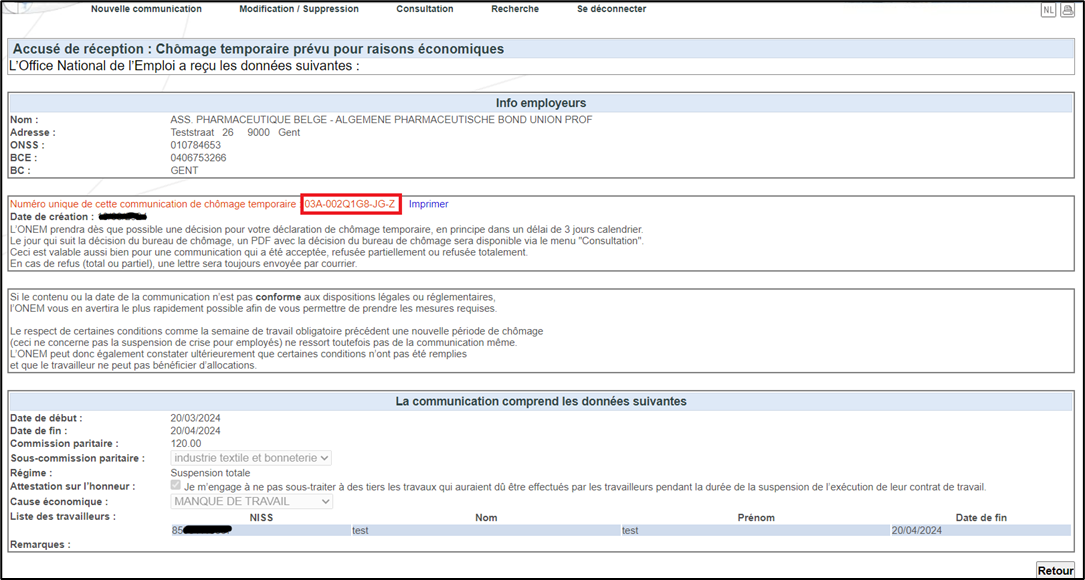
The page ‘Accusé de réception’ (acknowledgement of receipt) provides the following information:
The NEO will take a decision on your declaration of temporary unemployment as soon as possible, normally within 3 calendar days.
On the day following the unemployment office's decision, a PDF showing the decision will be available via the ‘Consultation’ (consultation) menu.
This is also the case if the application has been accepted, partially refused or totally refused.
In the event of a refusal (total or partial), a letter will also be sent by mail.
If the content or date of the communication does not comply with legal or regulatory provisions, the NEO will notify you as soon as possible so that you can take the necessary measures.
Compliance with certain conditions, such as the compulsory working week preceding a new period of unemployment (this does not apply to crisis suspension for employees) is not covered by the communication itself. Therefore, the NEO can later state that certain conditions have not been met and that the employee is not entitled to benefits.
Thepage acknowledgement of receipt confirms that a request has been sent and a ticket number has been generated.
Please follow steps 1 to 6 to submit a communication due to bad weather.
Temporary unemployment due to bad weather
Click on the button ‘introduire une communication’ (submit a communication) to submit a new communication. Please follow the steps as described below:
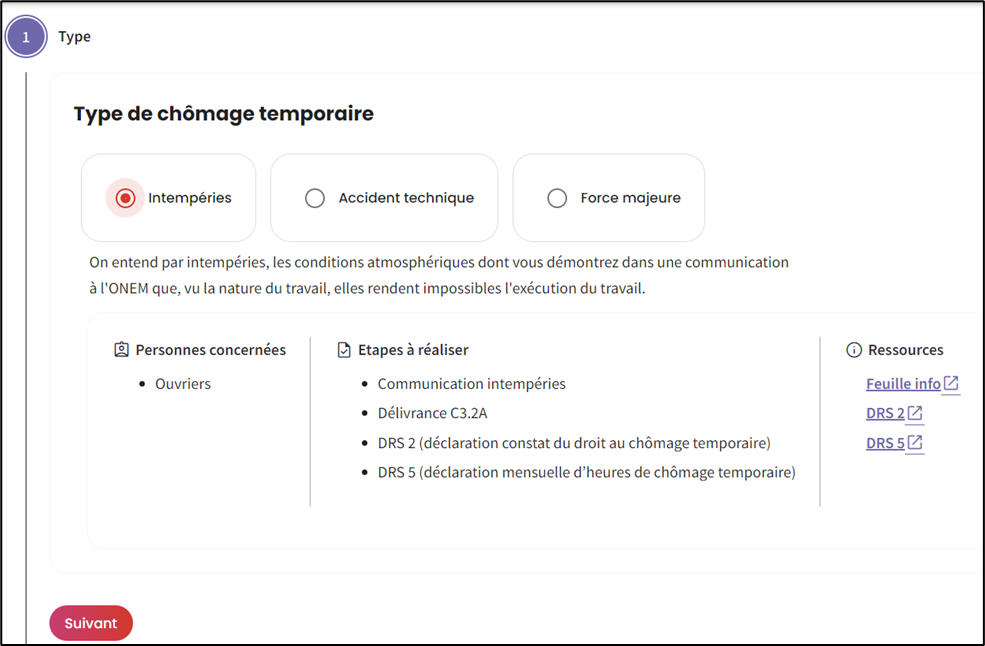
Step 1 ‘Type’ (type):
- Choose the type of temporary unemployment.
- Then click on ‘Suivant’ (next).
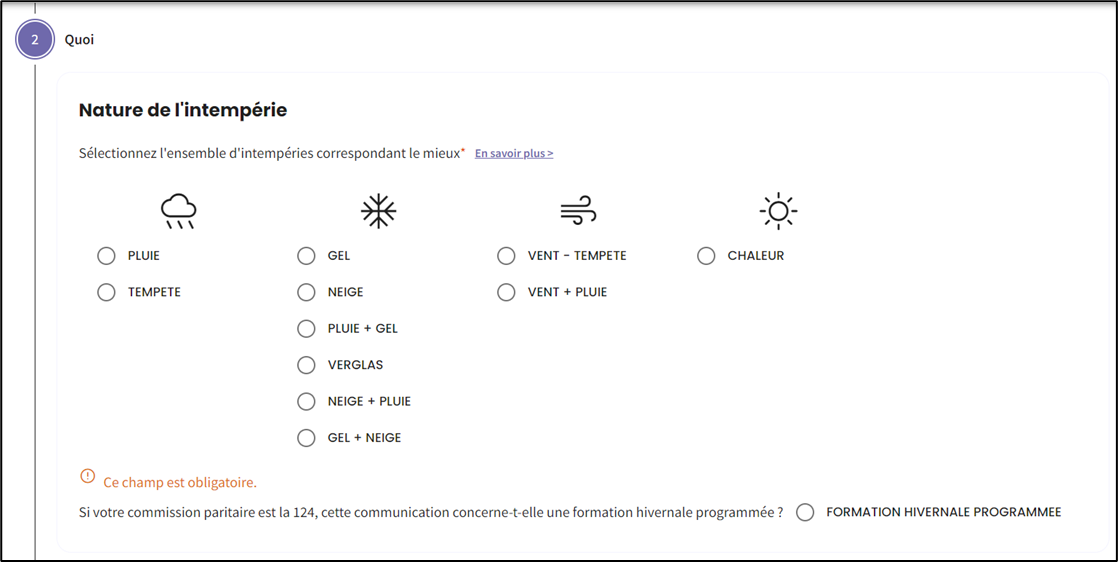
Step 2 ‘Quoi’ (what):
- Choose the type of bad weather.
For the joint committee 124, it is possible to indicate whether the communication is meant for a planned training program during winter.
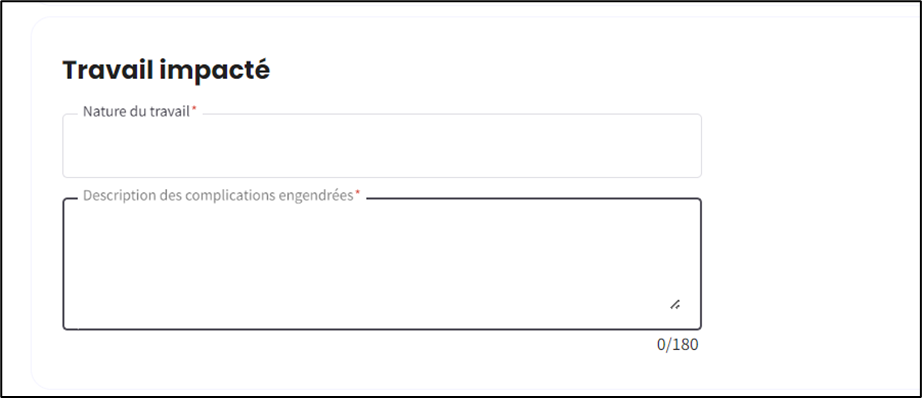
- Fill in the field ‘Nature du travail’ (nature of work) and describe the nature of the work.
- Fill in the field ‘Description des complication engendrées’ (description of complications) and specify the complications caused by the bad weather.
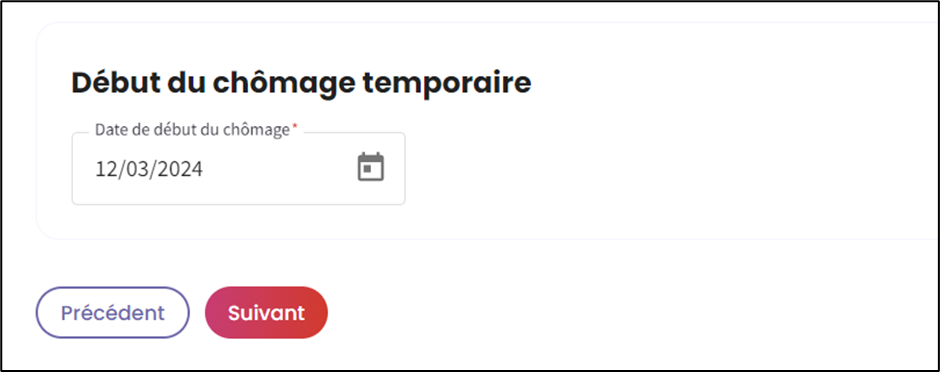
- Enter the start date of the temporary unemployment and click on ‘Suivant’ (next).
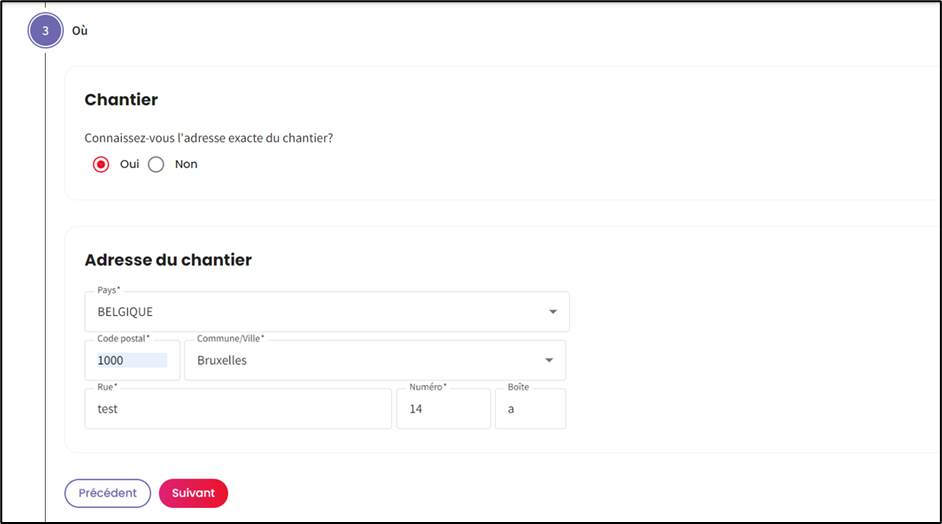
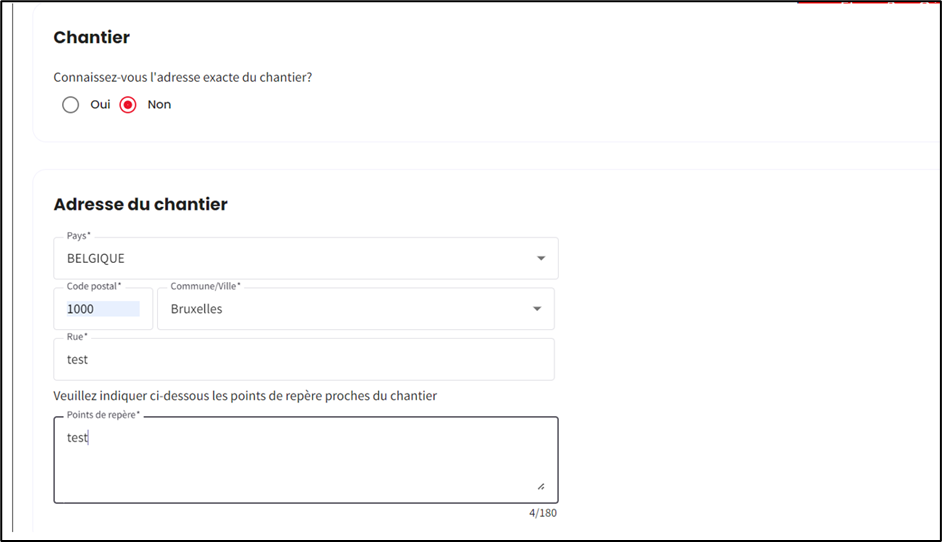
Step 3 ‘Où’ (where):
In the next screen you can specify the worksite. You have two possibilities.
- If the exact address of the worksite is known, click on ‘Oui’ (yes) and specify the address, then click on ‘Suivant’ (next).
- If the exact address of the worksite is unknown, click on ‘Non’ (non).
- You can point out landmarks close to the worksite to define the exact location of the worksite. Then click on ‘Suivant’ (next).
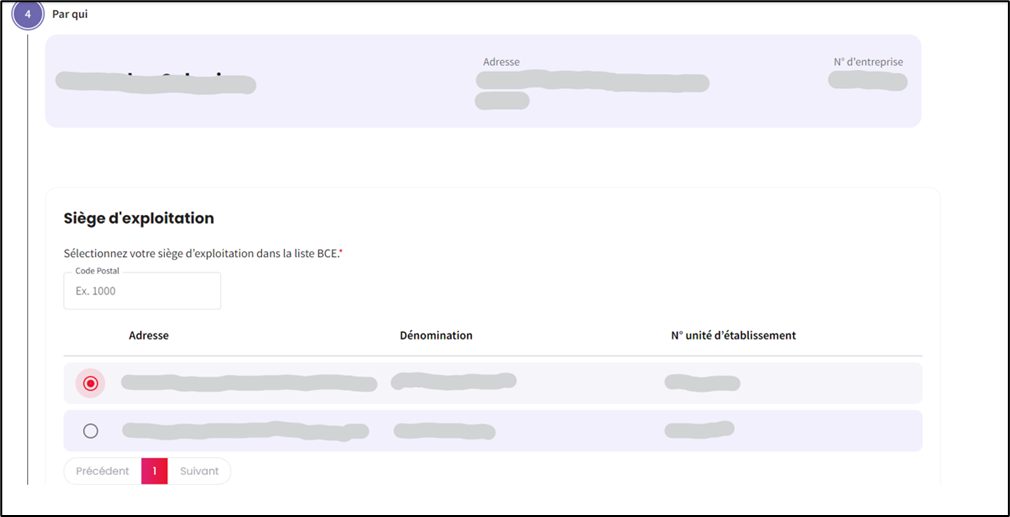
Step 4 ‘Par qui’ (by whom)
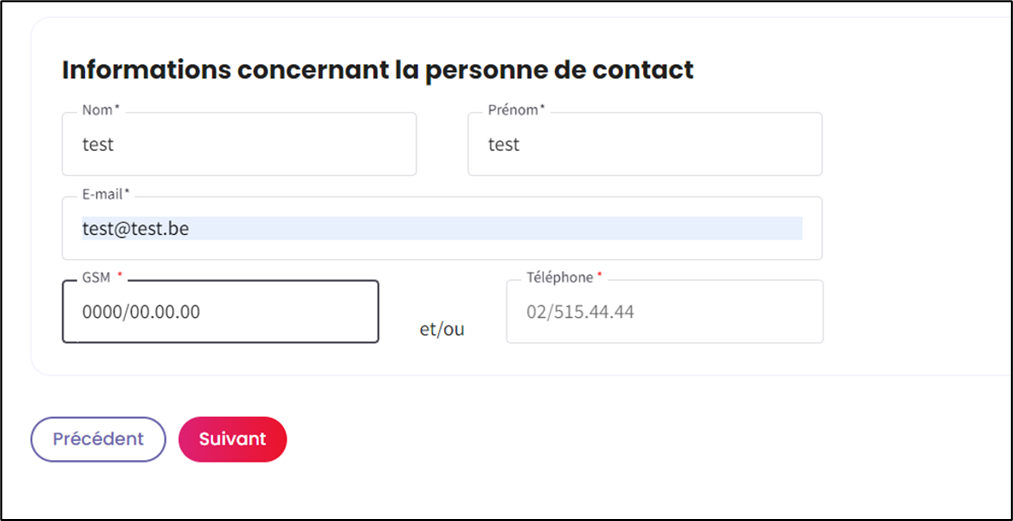
On the next screen you can enter information about the contact person.
- Choose the business place from the list and fill in the contact details.
- Then click on ‘Suivant’ (next).
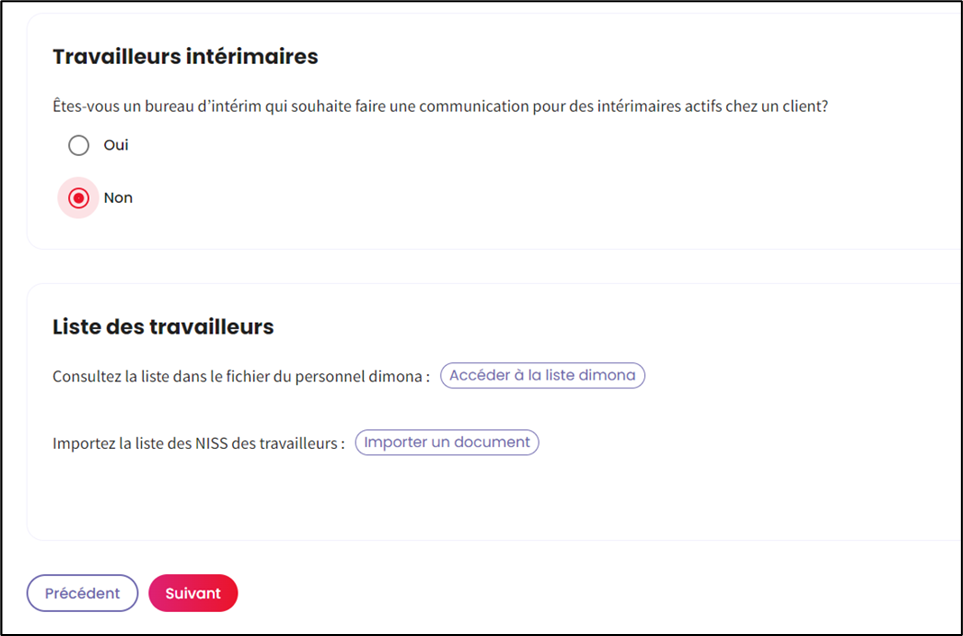
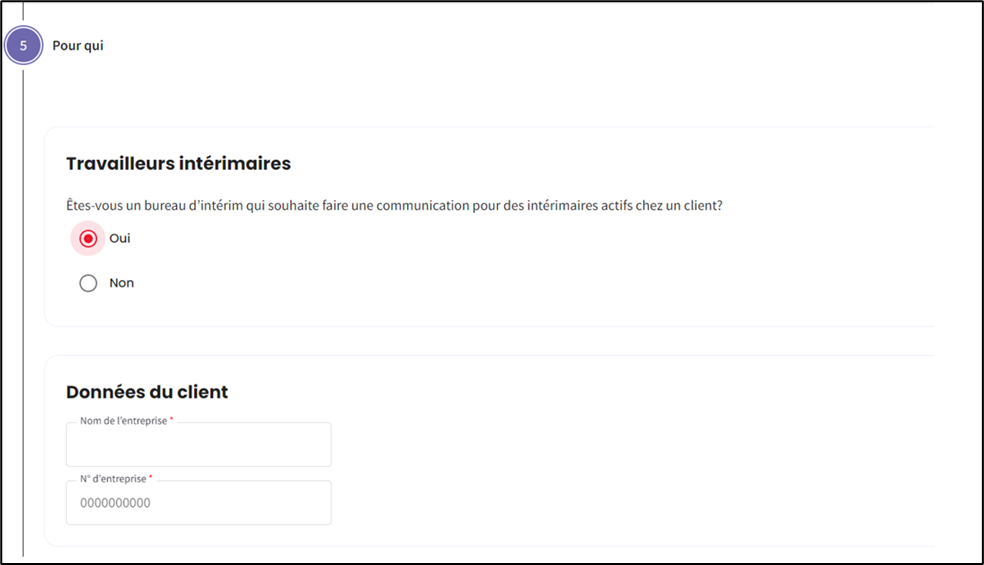
Step 5 ‘Pour qui’ (for whom)
On the screen that opens you will have to answer the question if you a regular employer or an employment agency.
- Regular employers select ‘Non’ (no).
- Temporary employment agencies select ‘Oui’ (yes).
- Temporary employment agencies submitting a request for one of their temporary employees working for one of their customers have to enter the customer’s details.
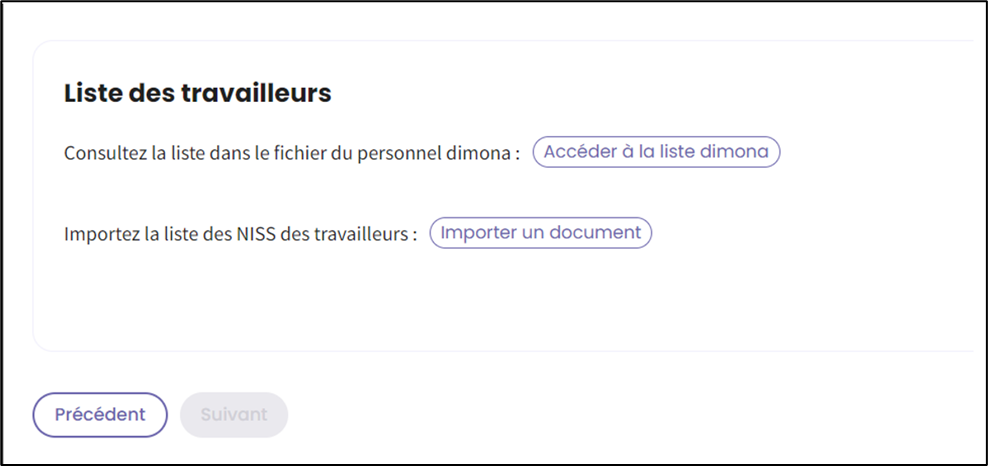
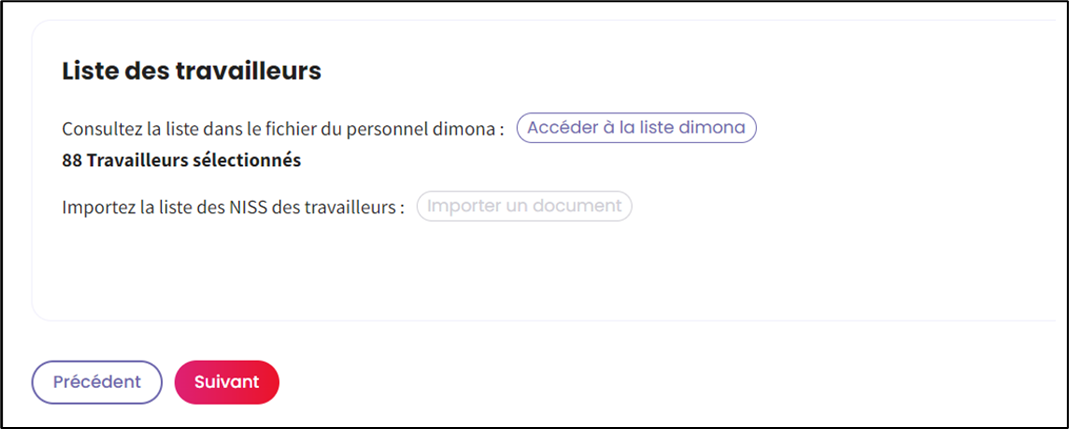
There are two ways to submit the list of employees who are temporarily unemployed due to force majeure.
- You can access the Dimona list via the button ‘Accéder à la liste Dimona’ (access the Dimona list).
- You can upload a file with the list of employees via the button ‘Importer un document’ (import a document).
If you’d like to access the Dimona list, a screen showing the list of employers opens.
- The Dimona list will show all the employees of the company who are registered in the Dimona.
- The employees of the company can be selected all at once by clicking the button on the top left (1).
- Employees can also be selected individually by clicking the second button on the top left (2).
- Once all employees have been selected, click on the button ‘Ajouter’ (add).
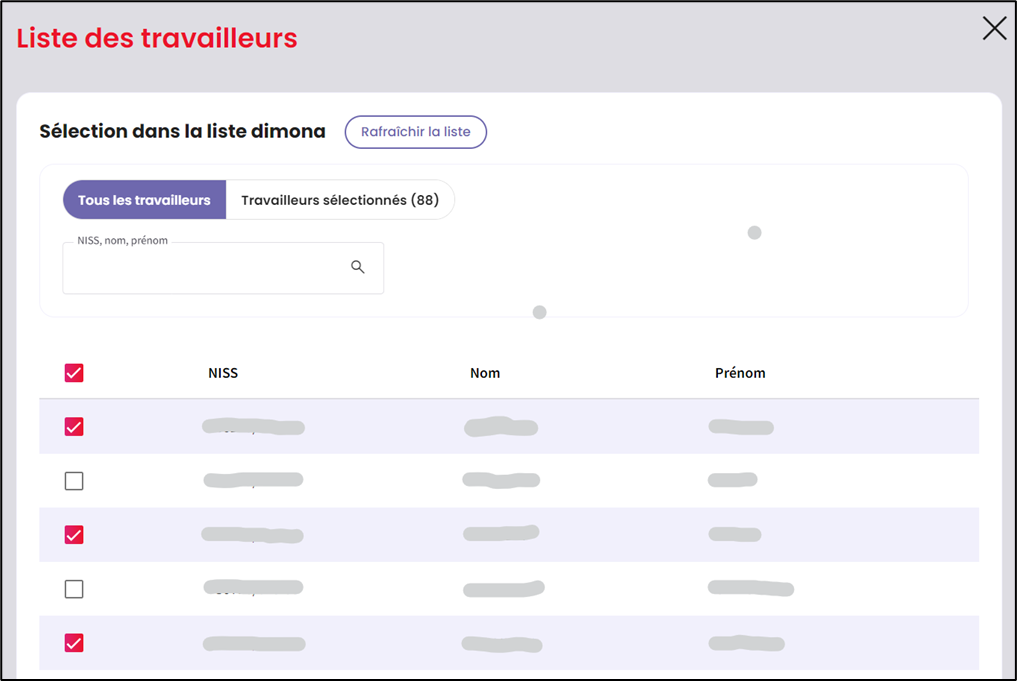

- If an employee is not on the list, check whether this employee has been registered in Dimona.
- After adding the employee to the Dimona list, please refresh the list and the employee will appear. For this, please click the button ‘Rafraîchir la liste’ (refresh list).
- By clicking on ‘Travailleurs sélectionnés’ (selected employees), you can consult the list of selected employees. By clicking on the bin icon, you can delete a selected employee.
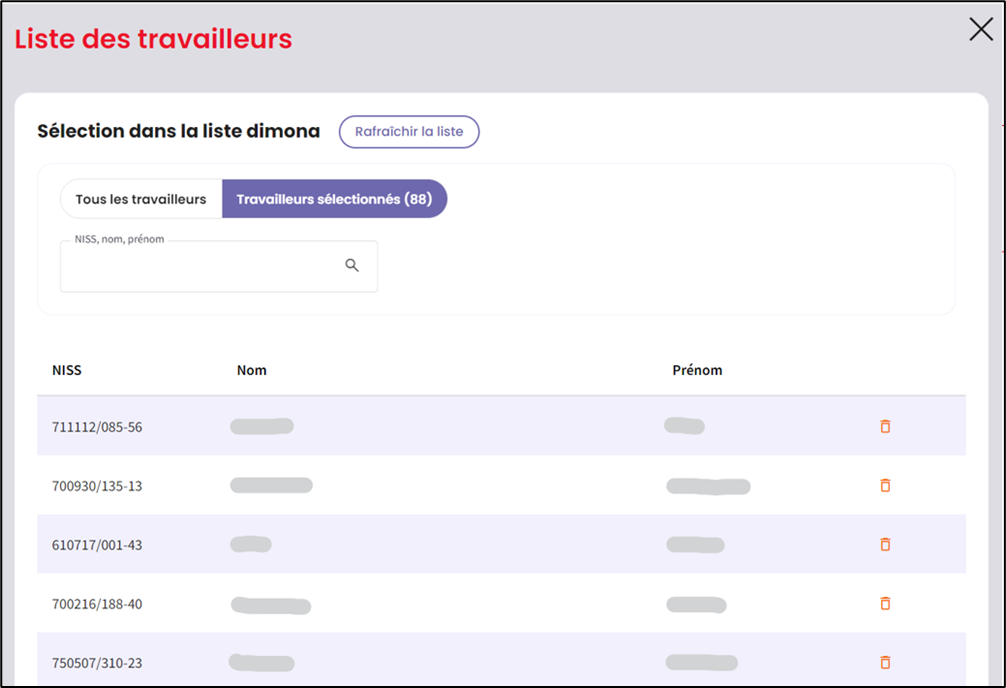
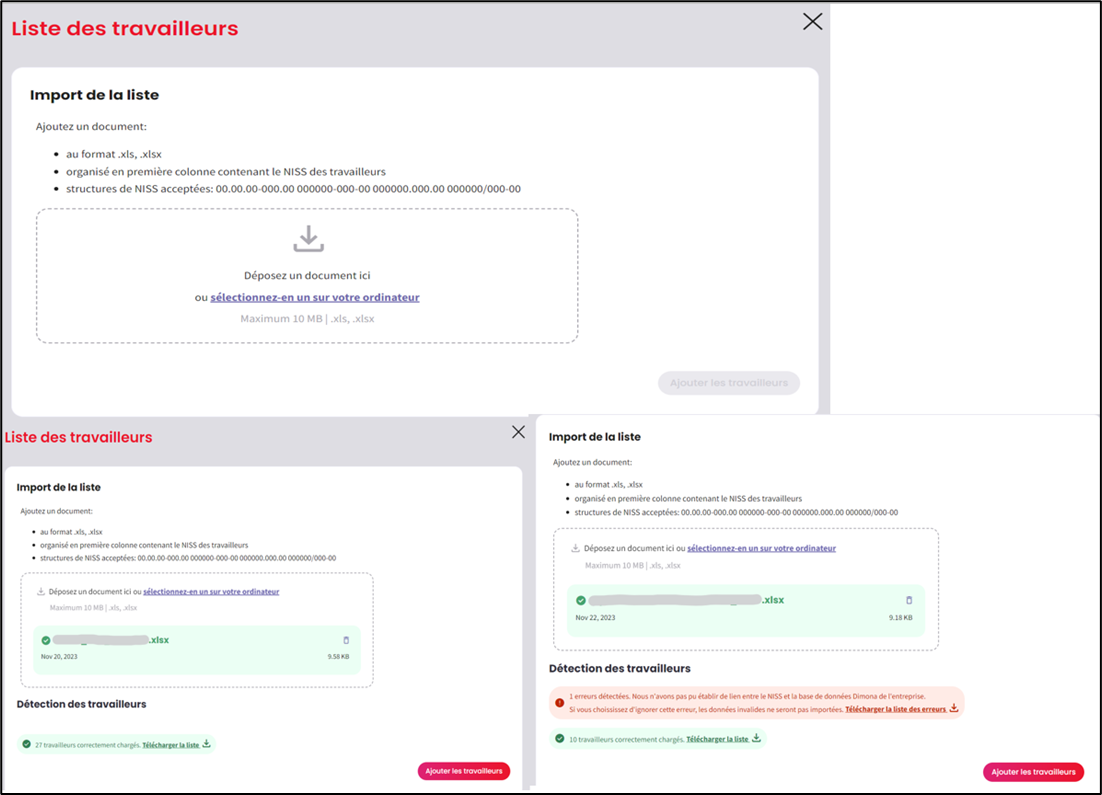
An alternative way to add employees to the communication consists of uploading a list of employees.
- The uploaded list of employees should be in .xls, .xlsx format.
- The first column of the list has to contain the register number (NISS) of the employees.
- The structure of the register number should be as mentioned in the application.
- After you have uploaded the document, click on ‘Ajouter les travailleurs’ (add the employees).
- After uploading the list of employees, the system detects the number of correctly uploaded employees.
- If the list of employees contains an error, this will also be detected by the system and you can download the list of errors.
Step 6 ‘Confirmation’ (confirmation):
- After you have clicked on the ‘Envoyer la communication’ (send communication) button, the message above will pop up.
- You have the option to re-read your communication and change certain elements.
- If everything is filled in correctly, click on ‘Oui, je veux l’envoyer’ (yes, send it).

The page ‘Accusé de réception’ (acknowledgement of receipt) opens and confirms that the request has been sent and a ticket number has been generated.
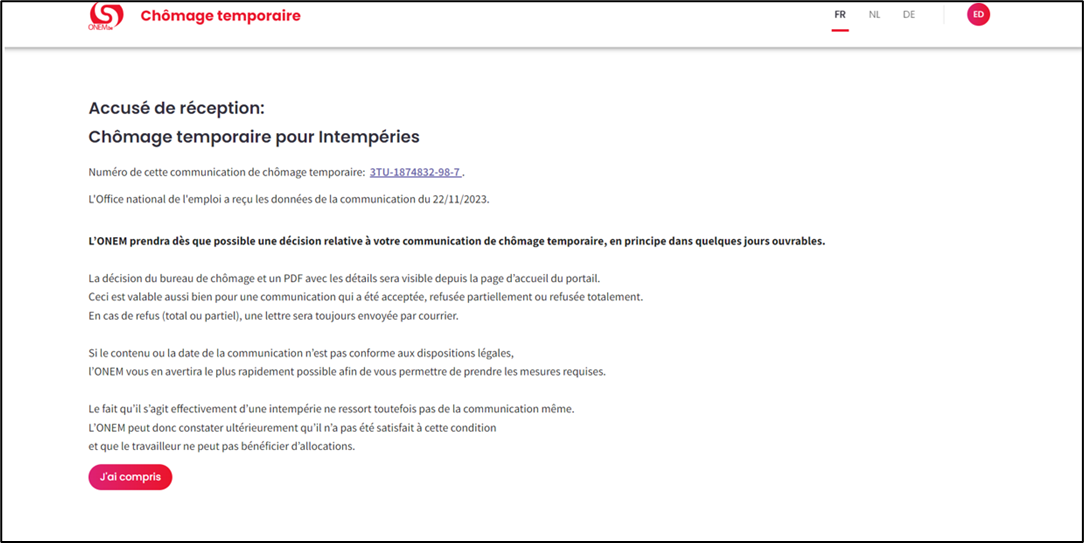
Furthermore, the acknowledgement of receipt provides the following information
NEO will take a decision on the basis of your communication of temporary unemployment as soon as possible, generally within a few working days.
The decision of the unemployment office and a PDF with the details will be visible at the homepage of the portal.
This applies in case the application has been accepted, partially refused or totally refused.
In the event of a refusal (total or partial), a letter will also be sent by mail.
If the content or date of the communication does not comply with the legal provisions,
the NEO will notify you as soon as possible so that you can take the necessary action.
However, the fact that the weather is bad, is not apparent from the notification itself.
Therefore, the NEO may subsequently establish that this condition has not been met and that the employee is not entitled to benefits.
Temporary unemployment due to a technical accident
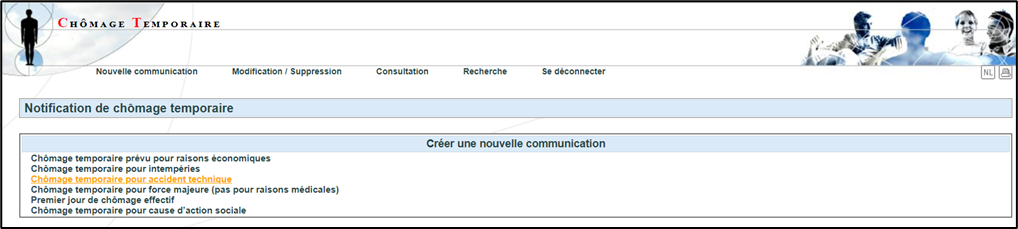
By clicking on the type of unemployment ‘Chômage temporaire pour accident technique’ (Temporary unemployment for technical accident), you will automatically be redirected to the link of the new temporary unemployment application.

The next screen provides the following information:
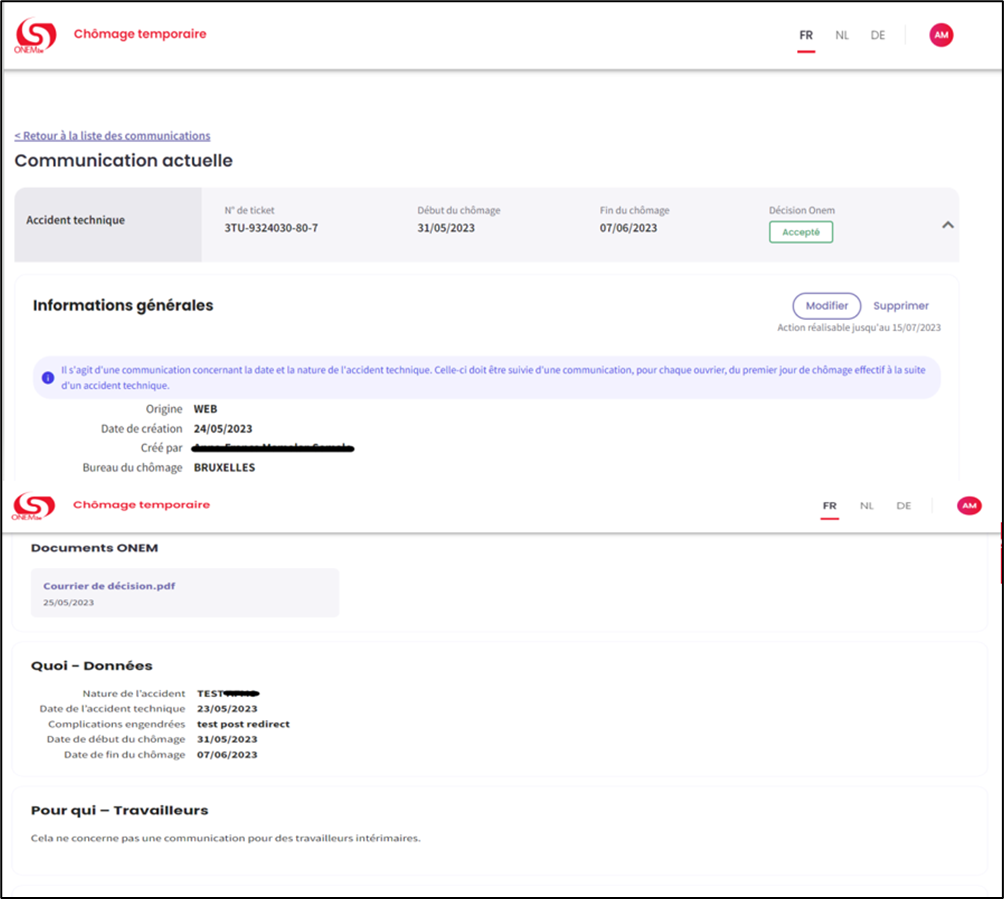
- Your data is listed on the top of the page: Name, Address, Company registration number. After you have clicked on the small arrow, the detail page opens. It resumes all the information from the communication.
- All the communications you have entered via the new app can is listed when you click the button ‘Communications’ (communications). You can edit or delete the communication by using the buttons ‘modifier/supprimer’ (modify/delete).The date until which changes can be done is indicated next to the buttons.
- You can consult the decisions via the button ‘Décision’ (decision). All documents related to this communication are displayed when you click the button ‘Courier de decision.pdf (decision information).
- You can consult the status of communications.
- By clicking on the ‘arrow’ button behind an information about the decision, you will get the details of each communication as well as the possibility to modify or delete it.
Screenshot that opens after an employee was chosen. It shows name and contact data at the top and communications at the bottom. Green button for "corrected" and orange button for "on hold", referring to the decision of the NEO
Step 1 ‘Type’ (type):
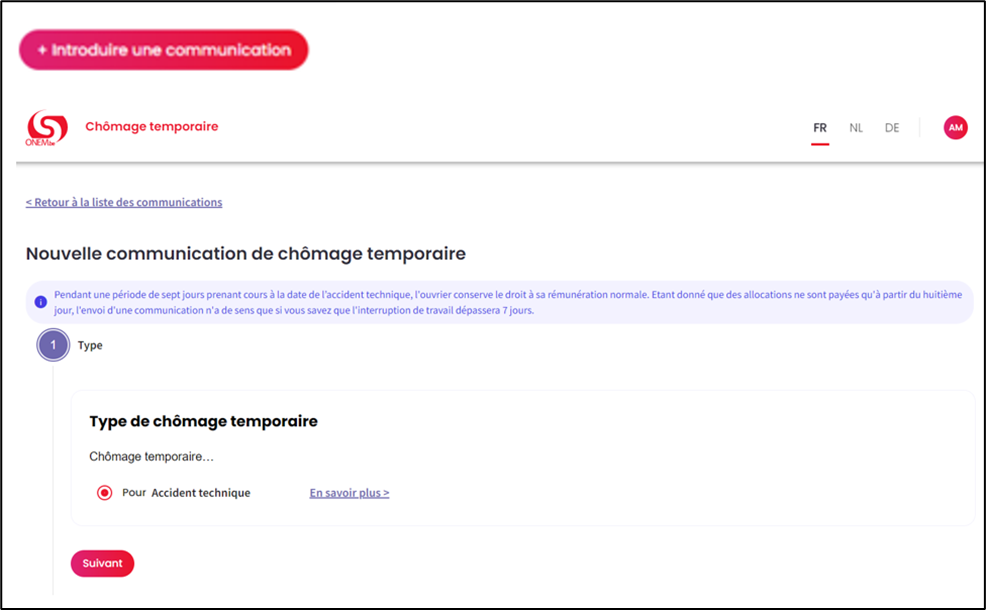
- Choose the type of temporary unemployment.
- Then click on ‘Suivant’ (next).

Step 2 ‘Quoi’ (what):
- Please introduce the following information:
- the nature of the technical accident;
- the complications caused by the technical accident;
- the date of the technical accident;
- the starting date of the unemployment;
- the end date of unemployment.
- Please click on ‘Suivant’ (next).
Step 3 ‘Pour qui’ (for whom):
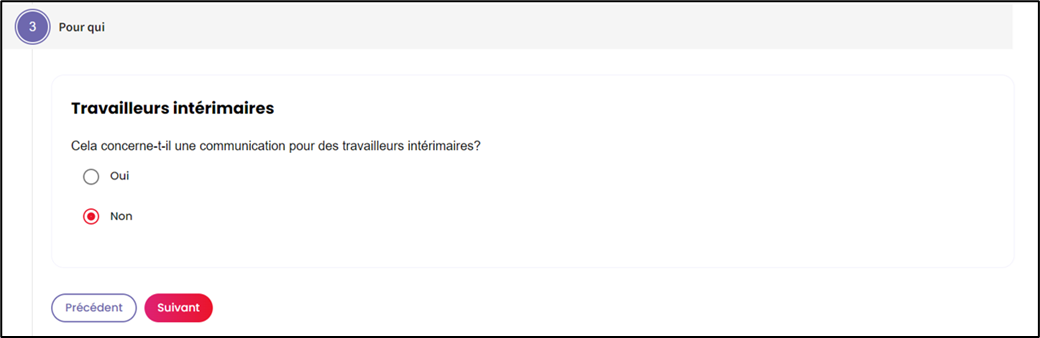
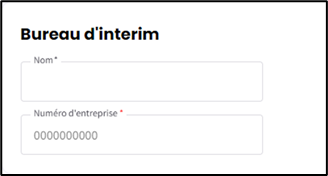
Indicate if this is a communication for an employment agency employee. If yes, please indicate which employment agency is involved.
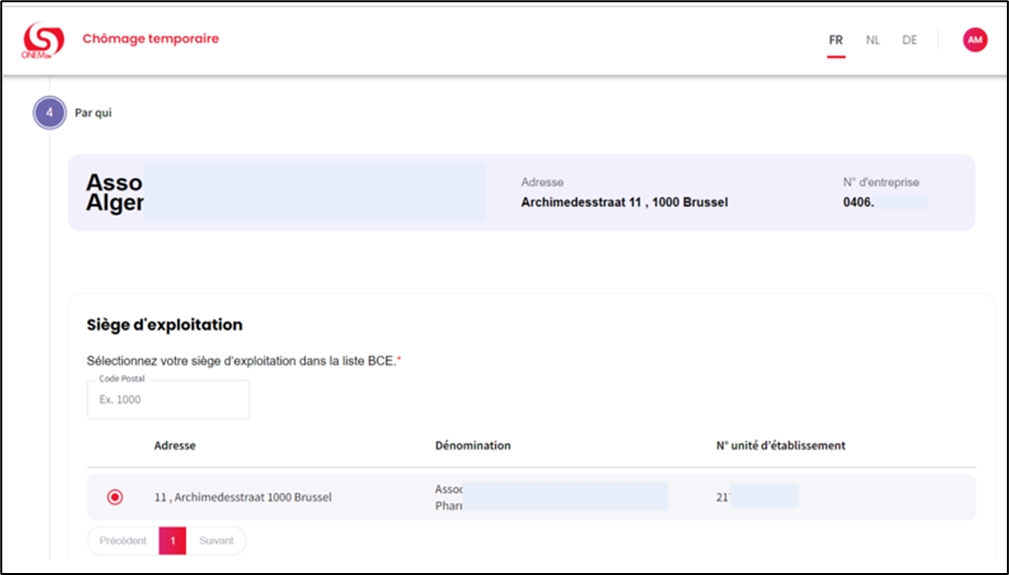
Step 4 ‘Par qui’ (from whom):
Select the establishment unit for which you wish to submit a communication.
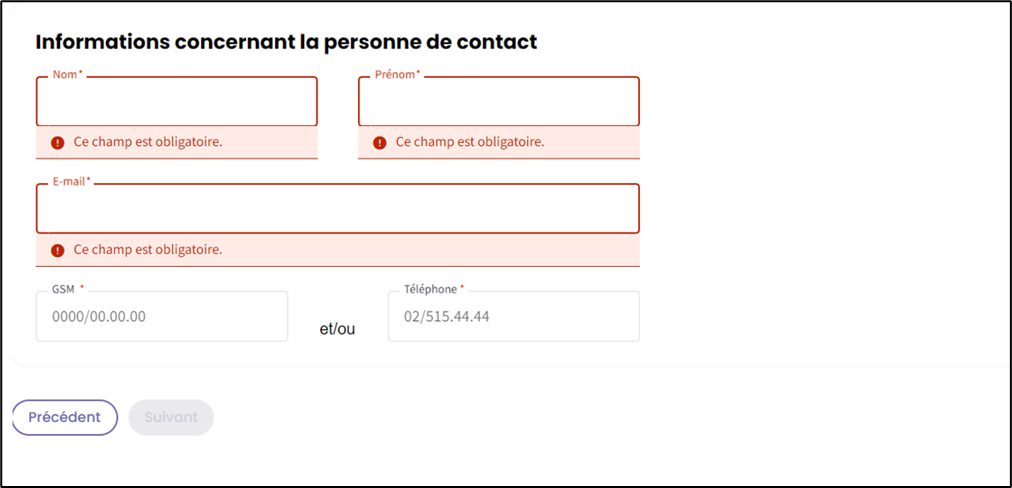
- Indicate the contact details, such as family name, name, e-mail (1).
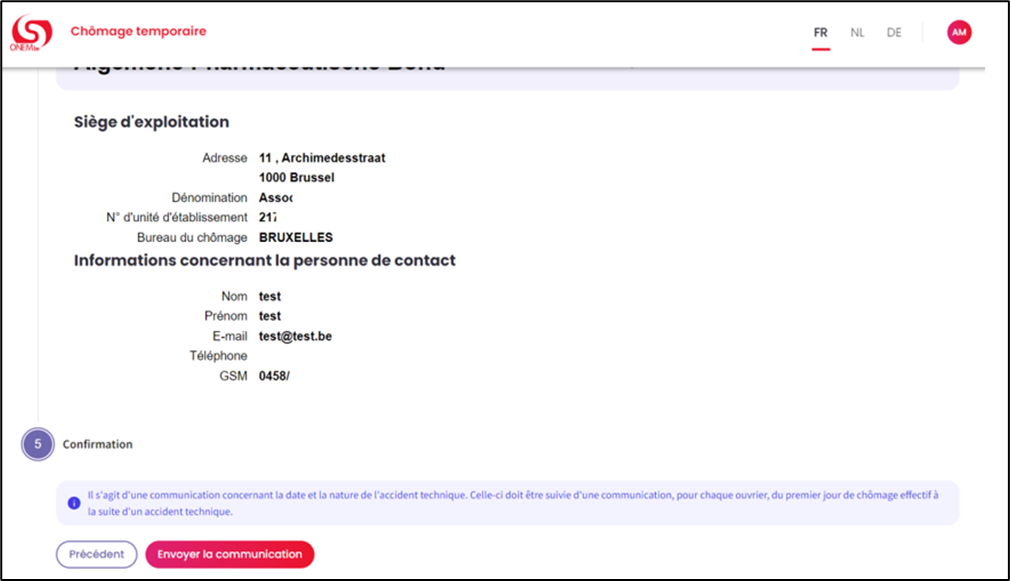
Before you send the communication, a summary of the encoded information will be available.
- Click on ‘Envoyer la communication’ (send the communication) (2).
You will receive a confirmation pop-up.
- Click on ‘Oui, je veux l’envoyer’ (yes, I want to send it).
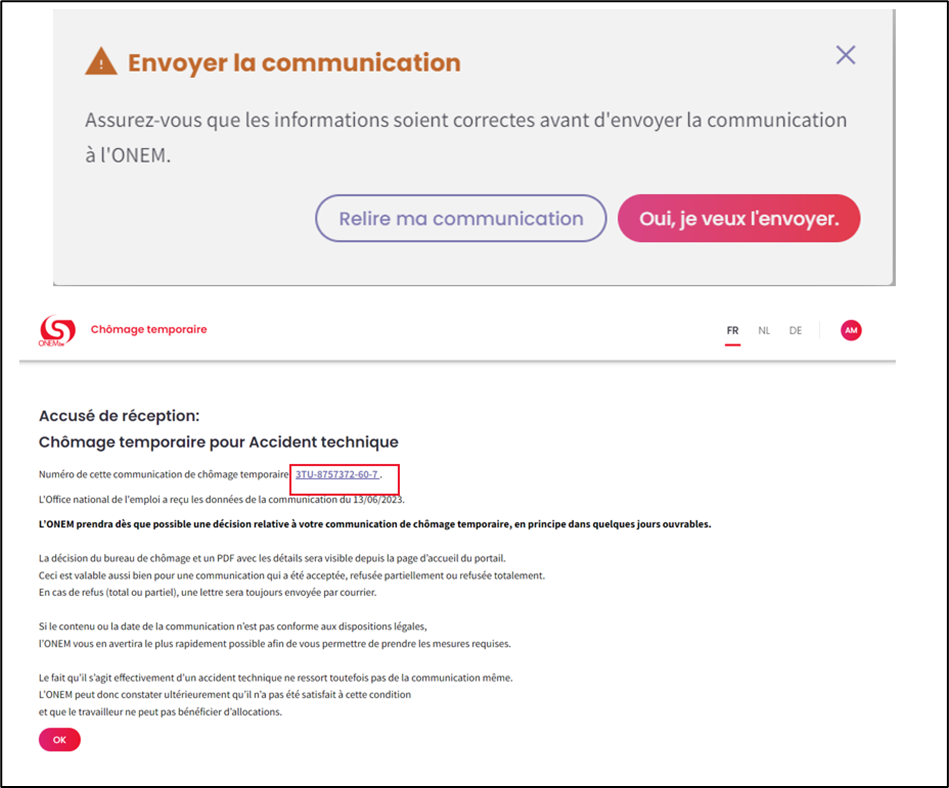
The page ‘Acknowledgement of receipt’ confirms that the request has been sent and a ticket number has been generated. Furthermore, the acknowledgement of receipt provides the following information:
NEO will take a decision on the basis of your communication of temporary unemployment as soon as possible, generally within a few working days.
The decision of the unemployment office and a PDF with the details will be visible at the homepage of the portal.
This applies in case the application has been accepted, partially refused or totally refused.
In the event of a refusal (total or partial), a letter will also be sent by mail.
If the content or date of the communication does not comply with the legal provisions,
the NEO will notify you as soon as possible so that you can take the necessary action.
However, the fact that there is a technical accident is not apparent from the notification itself.
Therefore, the NEO may subsequently establish that this condition has not been met and that the employee is not entitled to benefits.
Temporary unemployment due to force majeure

- From the home screen > Click on the button ‘Introduire une communication’ (submit a communication) to submit a new communication.
Step 1 ‘Type’ (type):
- Choose the type of temporary unemployment.
- Then click on ‘Suivant’ (next).
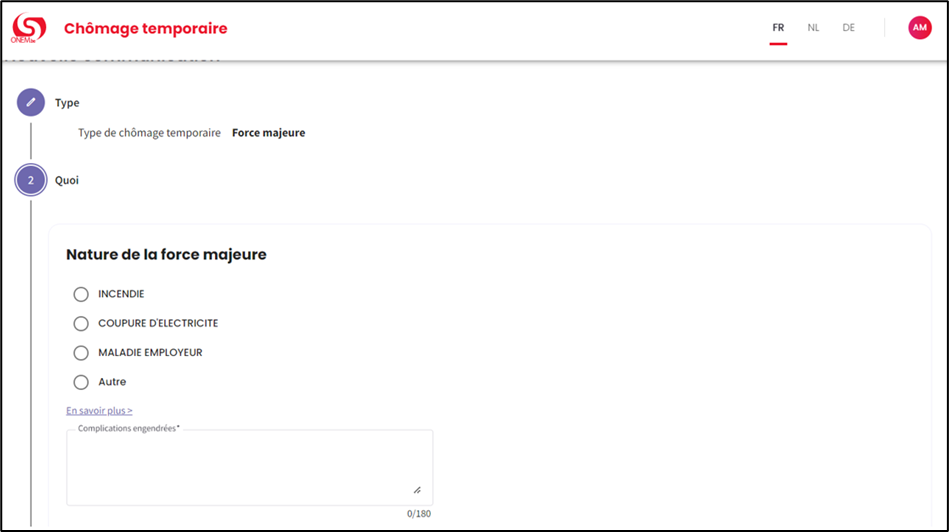
Step 2 ‘Quoi’ (what):
- Choose the nature of the force majeure from the following list: ‘incendie’ (fire), ‘coupure d’électricité’ (power cut), ‘maladie employeur’ (illness of employer), ‘autre’ (others).
- Describe the resulting complications.

- You have the option to upload documents, which will help the NEO staff to provide the decision faster.
- The comment field gives you the opportunity to provide additional information about your request.
- Enter the start and end date of temporary unemployment.
- Click on ‘Suivant’ (next).
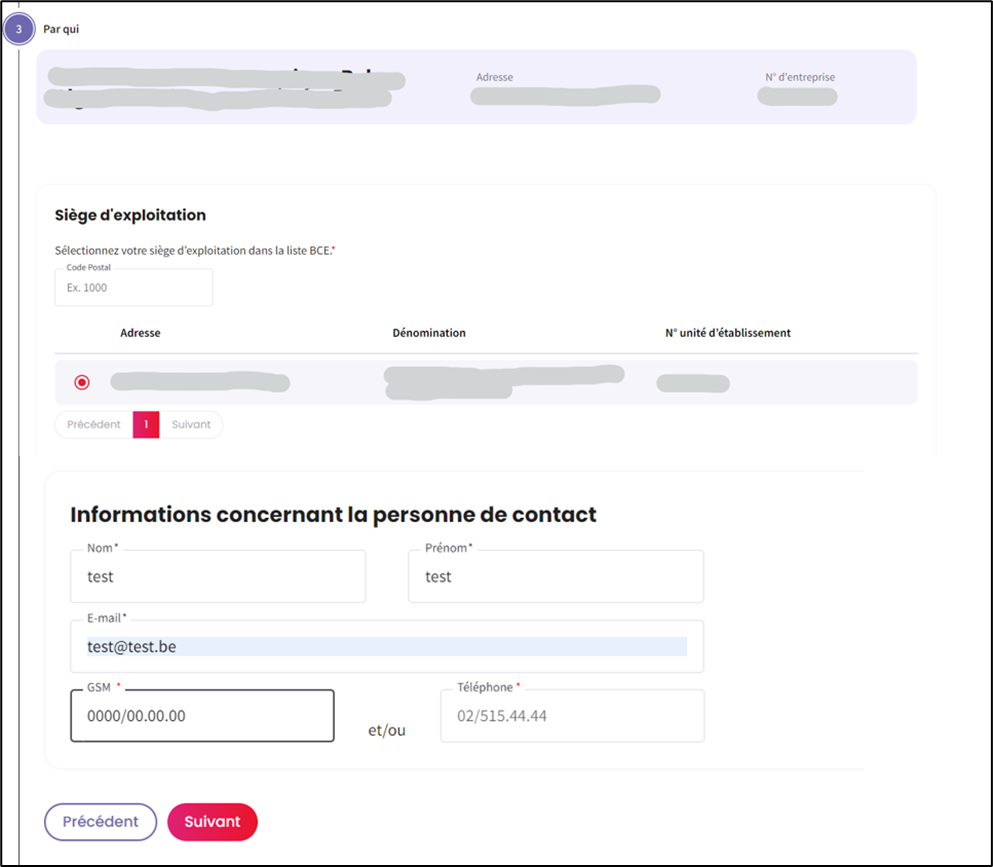
Step 3: ‘Par qui’ (by whom):
- Choose the place of business from the list.
- Fill in the contact details.
- Click on ‘Suivant’ (next).
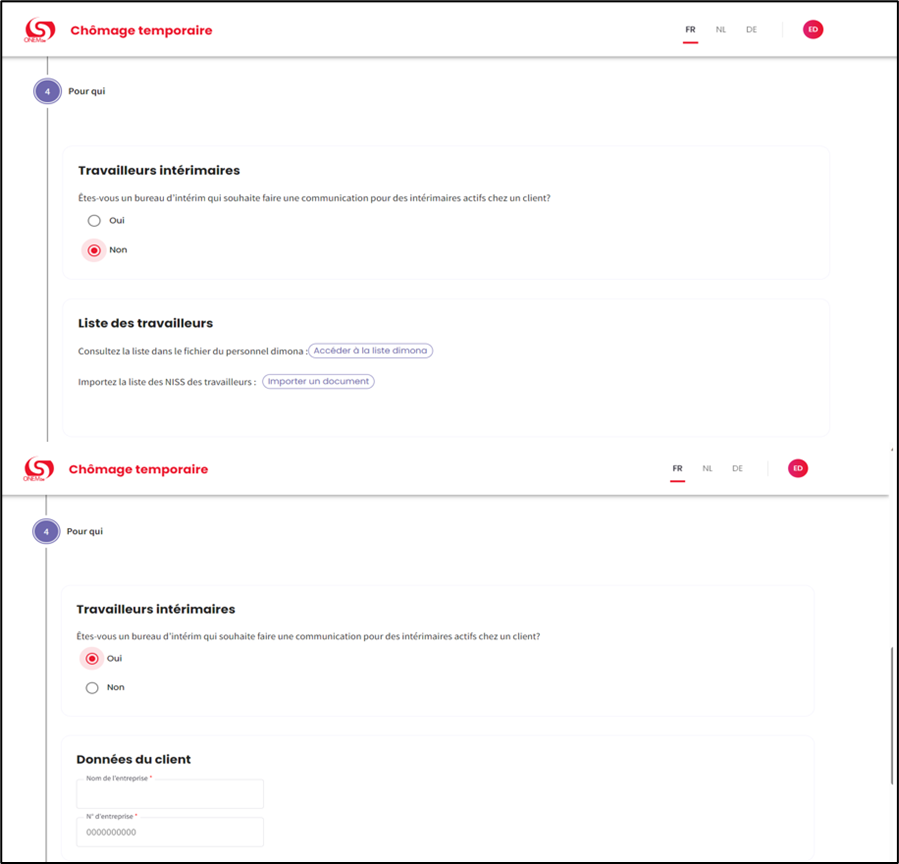
Step 4 ‘Pour qui’ (for whom):
- ‘Travailleurs intérimaires’ (temporary employees)
- If it is about regular employers > select ‘Non’ (non).
- If it is about temporary employment agencies > select ‘OUI’ (yes).
Temporary employment agencies submitting a request for one of their temporary employees working for one of their customers must enter the customer’s details.
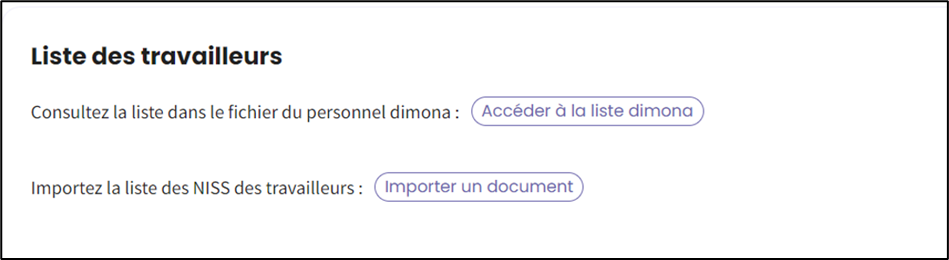
There are two ways to submit the list of employees who are temporarily unemployed due to force majeure.
- You can access the Dimona list via the button ‘Accéder à la liste Dimona’ (access the Dimona list).
- You can upload a file with the list of employees via the button ‘Importer un document’ (import a document).
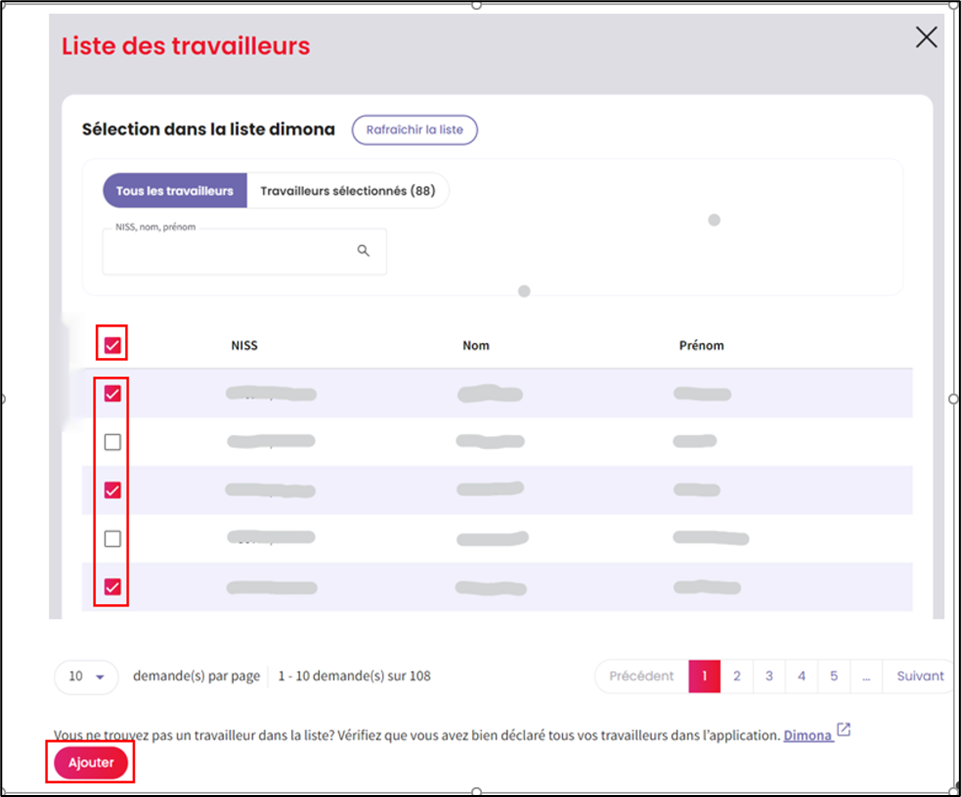
If you’d like to access the Dimona list, a screen showing the list of employers opens.
- The Dimona list will show all the employees of the company who are registered in Dimona.
- The employees of the company can be selected all at once by clicking the button on the top left.
- Employees can also be selected individually by clicking the second button on the top left.
- Once all employees have been selected, click on the button ‘Ajouter’ (add).
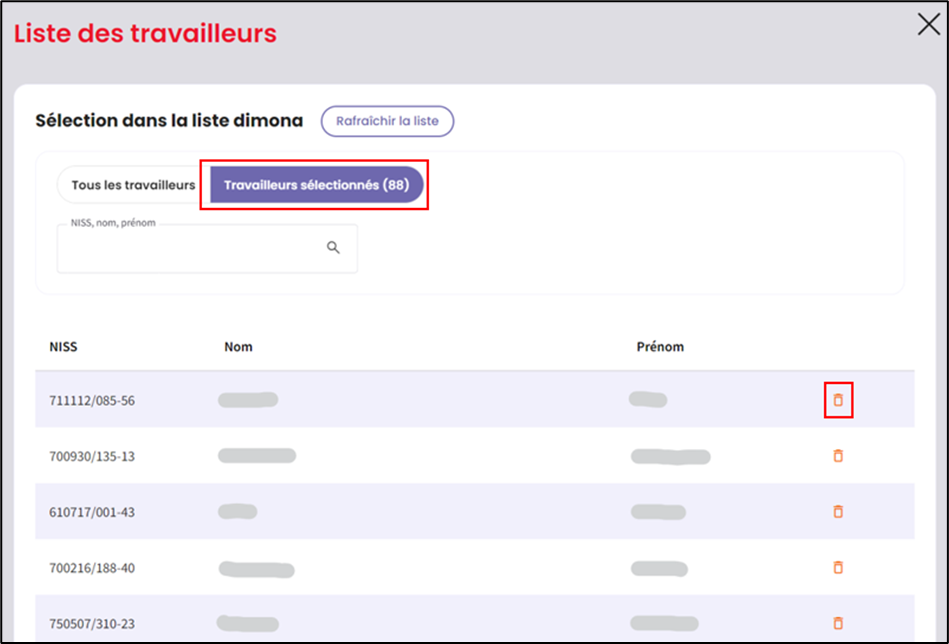
- If you click on ‘Travailleur sélectionnés’, you can consult the list of selected employees.
- If you click on the bin icon, you can delete a selected employee.
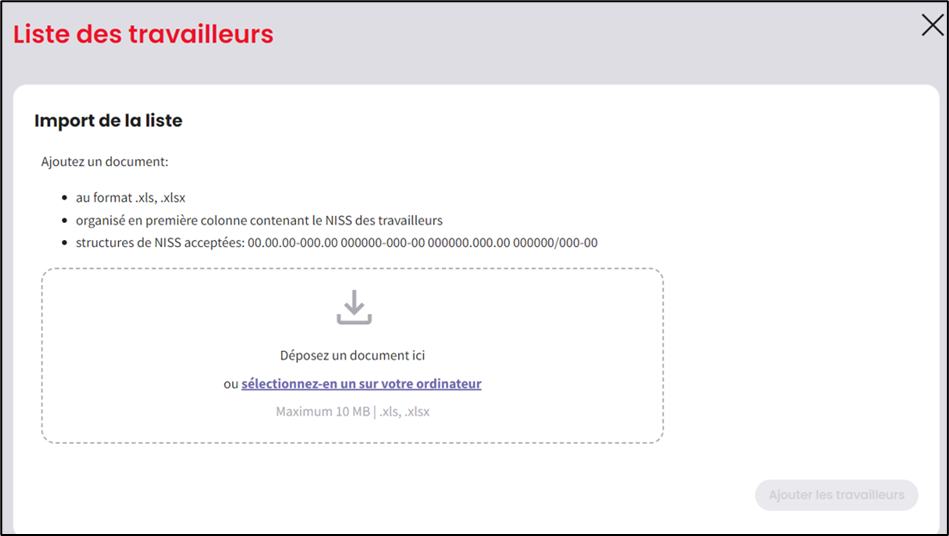
An alternative way to add employees to the communication consists of uploading a list of employees.
- The uploaded list of employees should be in .xls, .xlsx format.
- The first column of the list has to contain the register number (NISS) of the employees.
- The structure of the register number should be as mentioned in the application.
- After you have uploaded the document, click on ‘Ajouter les travailleurs’ (add the employees).

- If an employee is not on the list, check whether this employee has been registered in the Dimona.
- After you have added the employee on the Dimona-list, you can refresh the list and the employee will appear in the list > ‘Rafraîchir la liste’ (refresh list).
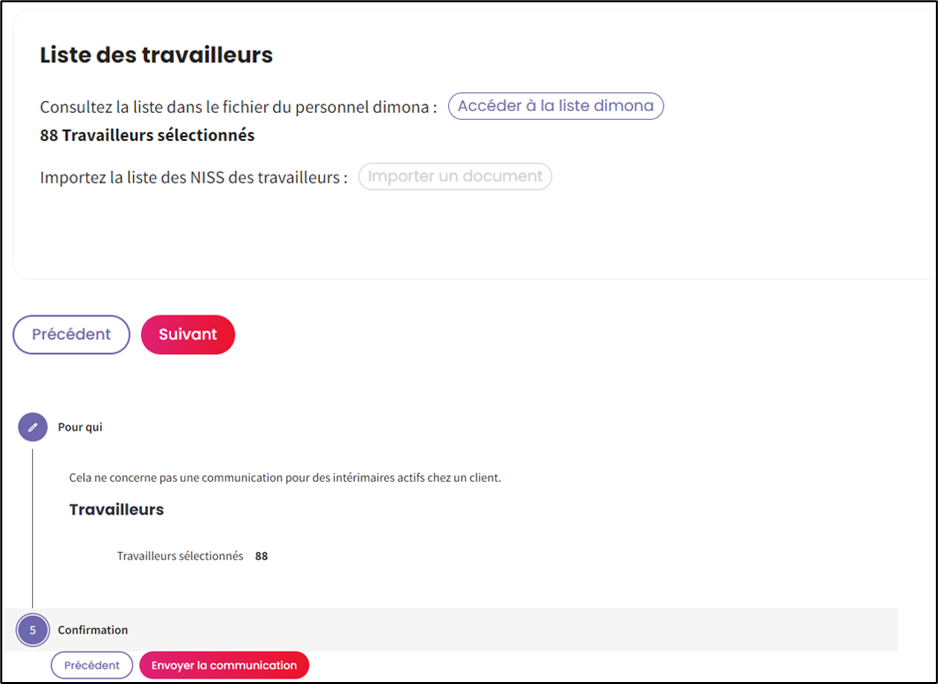
- The number of added employees is still visible and can still be modified at this stage.
- If all employees are selected, click on ‘Suivant’ (next).
Step 5 ‘Confirmation’ (confirmation):
- Check if everything has been filled in correctly. After you have confirmed and sent the communication, certain elements cannot be changed anymore.
- If everything is correct, click on ‘Envoyer la communication’ (send the communication).
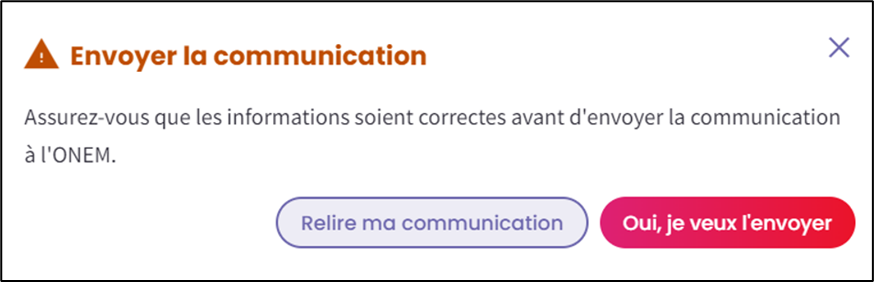
- After you have clicked on the ‘Envoyer la communication’ (send communication) button, a message will pop up to ask you if you are sure that all information is correct and that you will send the communication.
- You have the option to re-read your communication and change certain elements.
- If everything is filled in correctly, click on ‘Oui, je veux l’envoyer’ (Yes, send it).
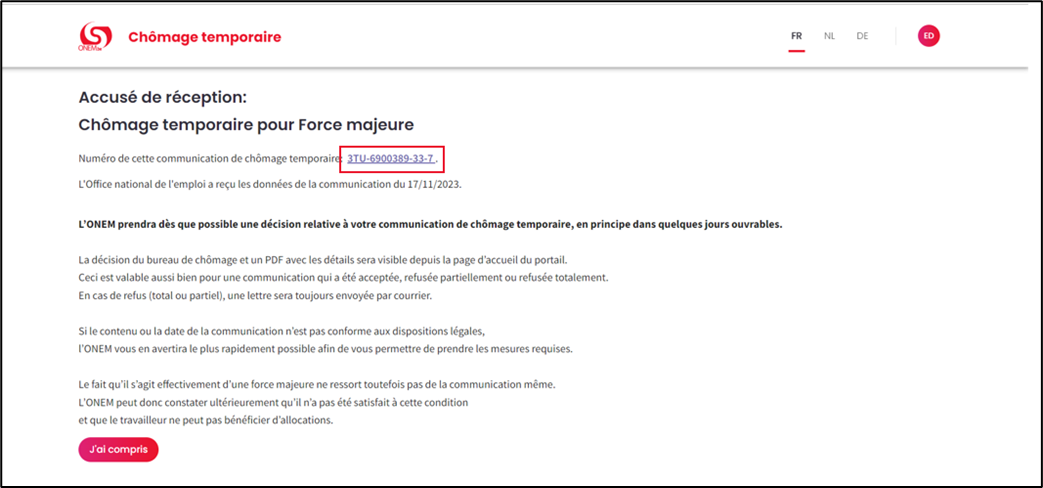
The page ‘Accusé de réception’ (acknowledgement of receipt) confirms that the request has been sent and a ticket number has been generated. Furthermore, the acknowledgement of receipt provides the following information:
NEO will take a decision on the basis of your communication of temporary unemployment as soon as possible, generally within a few working days.
The decision of the unemployment office and a PDF with the details will be visible at the homepage of the portal.
This applies in case the application has been accepted, partially refused or totally refused.
In the event of a refusal (total or partial), a letter will also be sent by mail.
If the content or date of the communication does not comply with the legal provisions,
the NEO will notify you as soon as possible so that you can take the necessary action.
However, the fact that there is a case of force majeure is not apparent from the notification itself.
Therefore, the NEO may subsequently establish that this condition has not been metand that the employee is not entitled to benefits.
Click on ‘J’ai compris’ (I understand) to go back to the list of communications.
First effective day of temporary unemployment
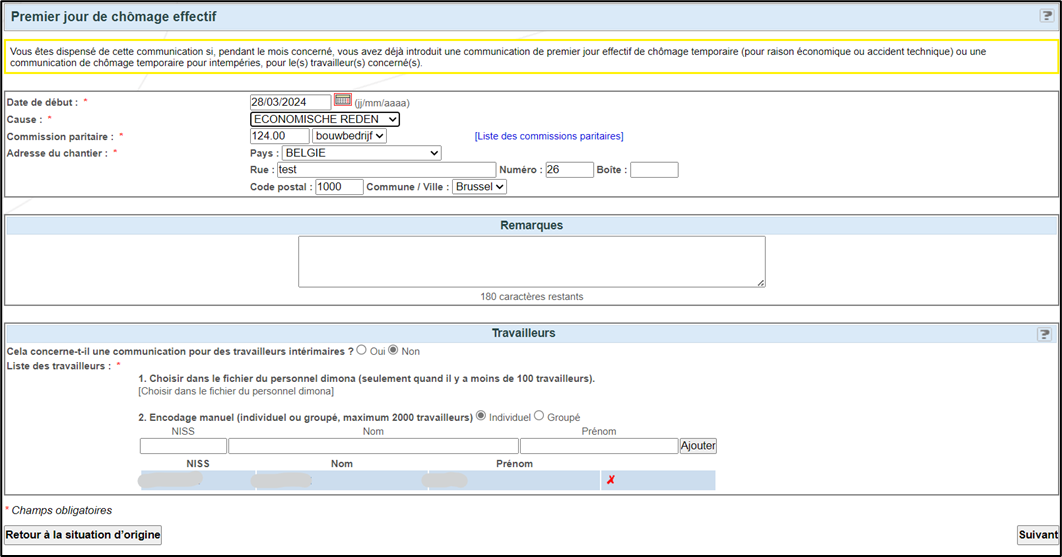
Check that the information entered is correct and click on ‘Envoyer’ (send).
The following information will be displayed on the screen:
- Start date of the first effective day of unemployment
- Cause
- Joint commision
- Site adresse
- List of employees
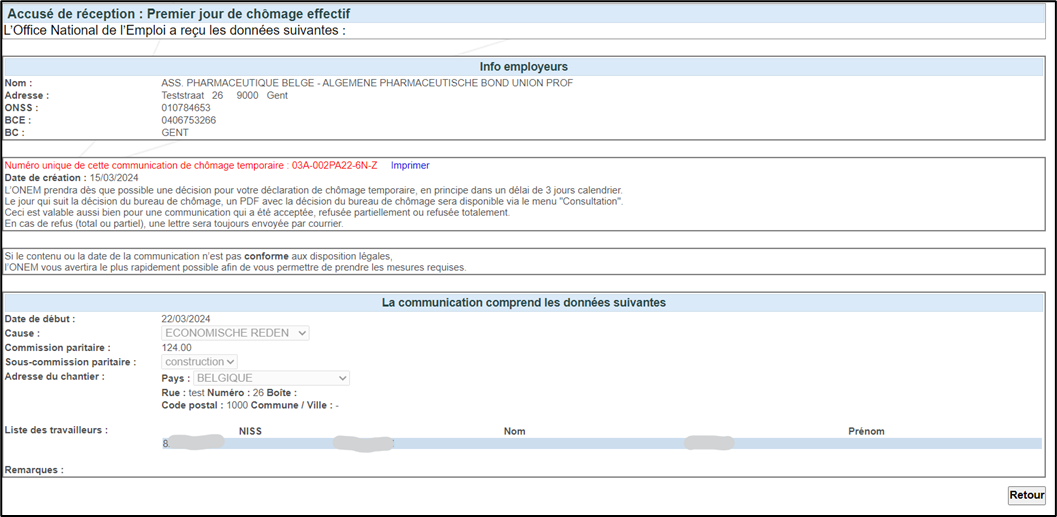
The page ‘accusé de réception’ (acknowledgement of receipt) confirms that the request has been sent and a ticket number has been generated.
Temporary unemployment due to social action
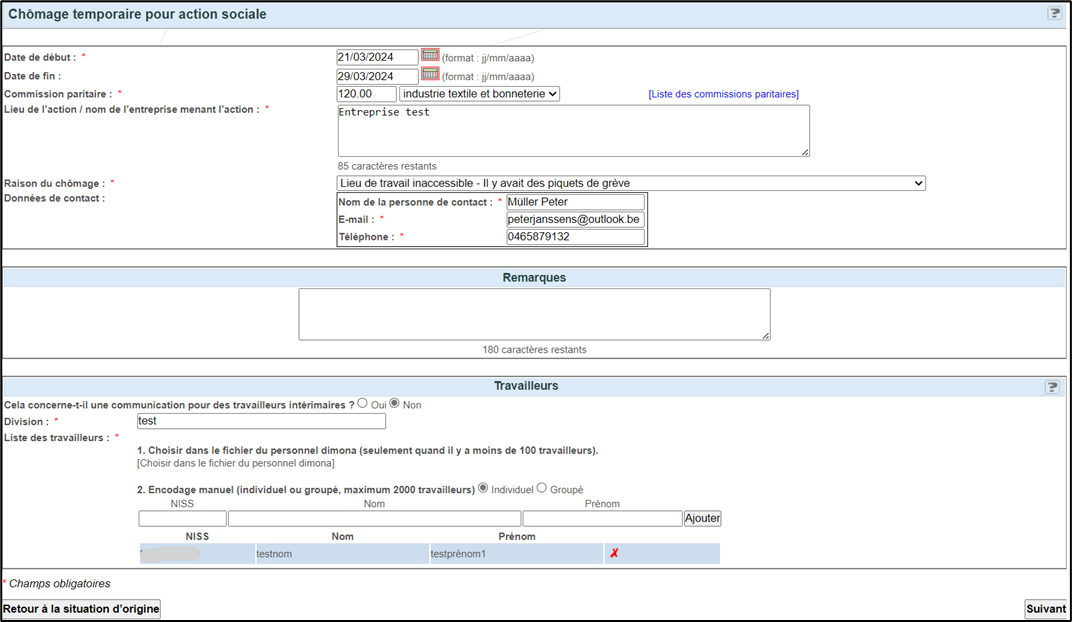
Please fill in the fields on the screen:
- Enter the start and end date.
- Choose the joint committee concerned and the level.
- Specify the place or the name of the company leading the action.
- Choose the cause of unemployment from the dropdown menu.
- Enter the contact details.
- Enter the name of the division concerned.
Please also complete the list of employees in the Dimona personnel file. You have two possibilités.
- You click the button ‘Choisir dans le fichier du personnel Dimona’ (choose from Dimona file), or
- You encode manually by clicking the button ‘Encodage manuel’ (manual encoding).
- You can choose between individual or grouped encoding by clicking the button ‘individuel ou groupé’.
- Click on ‘Ajouter’ (add).
- As soon as the list of employees is completed, click on ‘Suivant’ (next) to confirm.
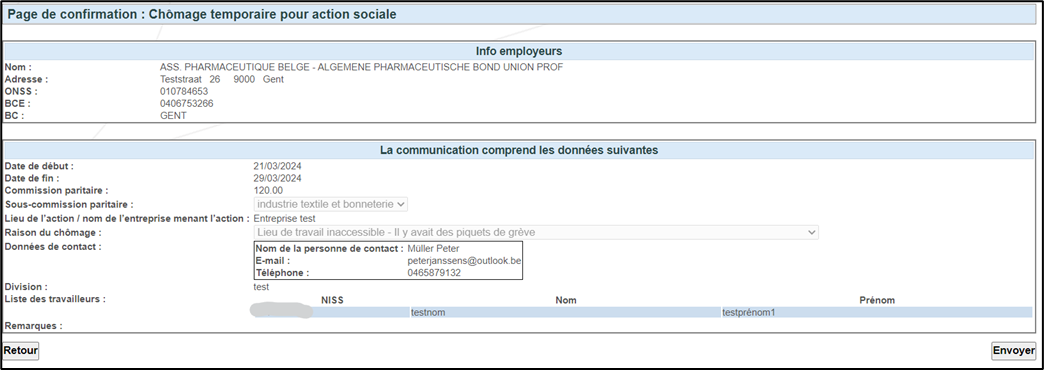
Check that the information entered is correct and click on ‘Envoyer’ (send).

The page ‘Acknowledgement of receipt’ confirms that the request has been sent and a ticket number has been generated
Editing/Deleting and Viewing Communications
In the event of communication due to bad weather or communication of the first day of unemployment for economic reasons, a modification or cancellation is possible until the 15th day of the month following the month in which the first day of unemployment occurs.
However, it is not allowed to change the start date of temporary unemployment.
For other types of unemployment, a modification or cancellation is possible until the 15th day of the month following the month in which the last day of unemployment occurs.
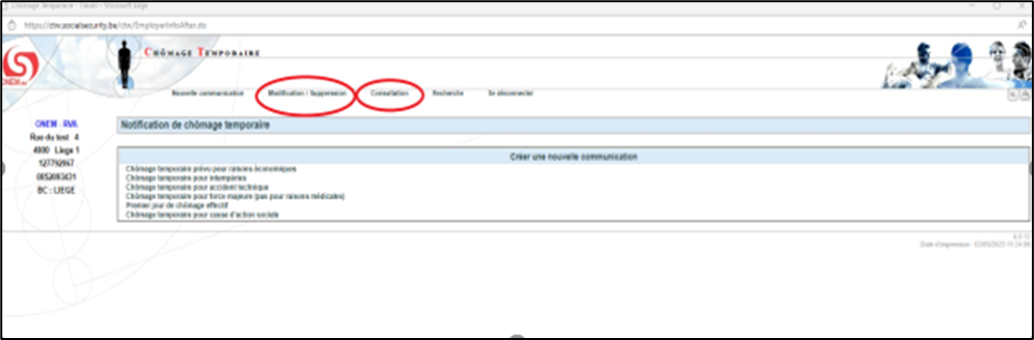
If you click the buttons ‘Modification/Suppression’ (modification/deletion) and ‘Consultation’ (consultation), you have the possibility to modify certain fields in the communication or to cancel the communication (issue of a new ticket number).
The consultation tab provides an overview of communications created by the employer.
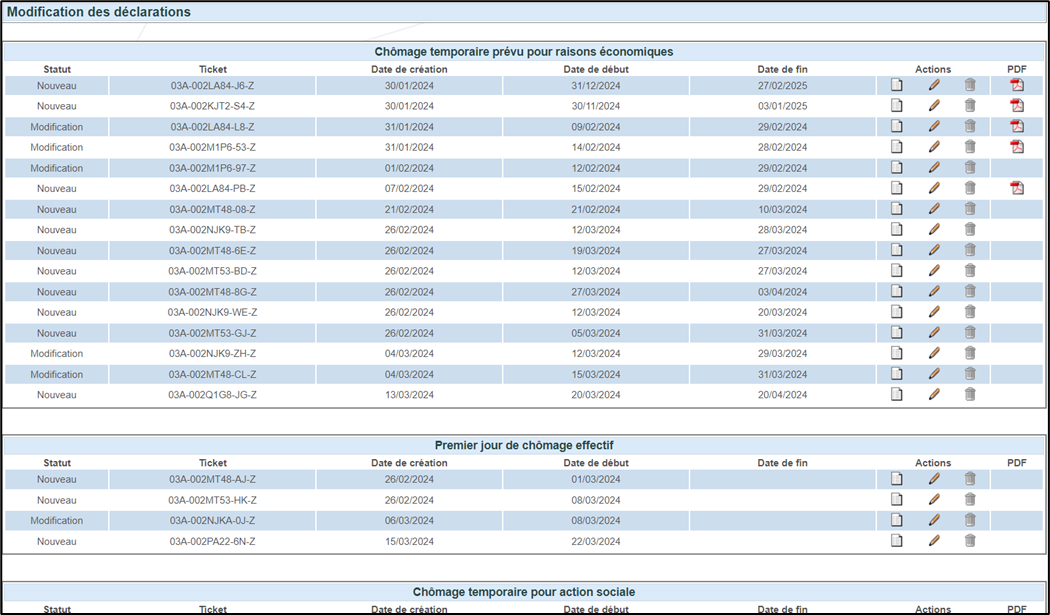
By opening the tab ‘Modification/Suppression’ (modify/delete), the employer can modify (using the pencil button) or delete (using the bin button) a communication he has previously entered and for which the change deadline has not run out yet.
Communications are listed by type of unemployment.
Once a communication has been decided, the PDF file of the decision letter is available.
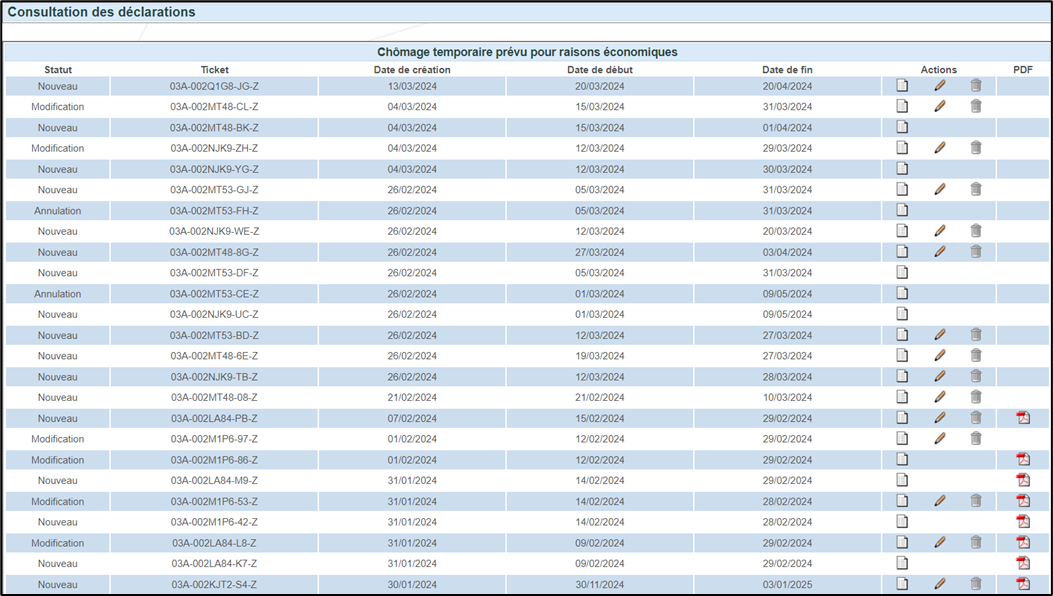
If you modify or delete a communication, a new ticket will be generated.
The tab ‘Consultation’ (consultation) lists all communications entered by the employer in the last 6 months.
All communications with their various statutes are available via the buttons ‘Nouveau’, ‘Modification’, ‘Annulation’ (new/modify/cancel).
It is possible to consult the details of the communication (by clicking on the sheet button), to modify or delete the communication, or to check the e-mail once the unemployment office has taken a decision concerning the communication.

Funded by the European Union – NextGenerationEU. Views and opinions expressed are however those of the author(s) only and do not necessarily reflect those of the European Union or European Commission. Neither the European Union nor the European Commission can be held responsible for them.
National Employment Office (NEO)
- Telephone: +32 (0)2 515 44 44
- Website: www.onem.be (in french)
You can also get in touch via our Contact page.


