

e-Box Enterprise - online service
Before you start
What is e-Box Enterprise?
e-Box Enterprise is your company's secure electronic mailbox, centralising all official communication between companies and government institutions in one secure electronic mailbox.
Through e-Box, you will receive documents (PDF) and messages from social security institutions, as well as municipal, regional and federal authorities. The list of senders is growing.
You can reply directly to some messages. This way, your communication with the institutions is convenient, fast and secure.
What do you need to use e-Box Enterprise?
Secure access as a Local Administrator, co-Local Administrator or user under the ‘NSSO Employer’ (Employeur ONSS) or ‘Company without staff’ (Entreprise sans personnel) domain for companies not registered as employers with the NSSO. Each company is given one of these two standard domains.
If the company does not yet have a secure access, it can designate a Chief Access Manager via the Management of Access Managers on the CSAM website. The Chief Access Manager can then designate a Local Administrator, Local Co-Administrators and/or users via the Access Management section under Management of Access Managers on the CSAM website. The Local Administrator and Local Co-Administrator of the standard ‘NSSO Employer’ (Employeur ONSS) or ‘Company without staff’ (Entreprise sans personnel) domains automatically have secure access to e-Box Enterprise. For a basic user to have access, the ‘e-Box Administrator’ box must be ticked in Access Management.
Go to the e-Box Enterprise page on the social security portal an click the Access e-Box as a company button (Accéder à e-Box en tant qu’entreprise).
Clicking the button takes you to a login screen that is also available in English.

Log in with one of the methods displayed: MyGov.be, eID, itsme, eIDAS or a username and password combined with a code sent by a mobile app or by email.
eIDAS is the European cross-border system that allows access to online services with authorised ID keys from a selection of EU countries. You can find more information on the eIDAS Help page on the CSAM website.
After logging in, you will see a screen where e-Box asks your permission to access your personal data or specific functionalities and services.
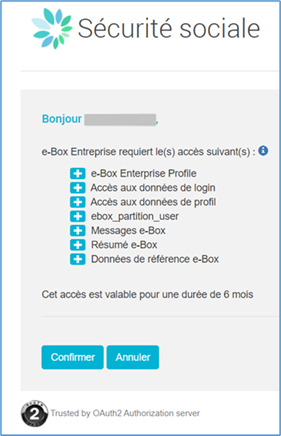
Each line corresponds to a feature that e-Box requires in order to function correctly. Click the + symbol next to each feature for more information on each of the functions displayed.
Click Confirm (Confirmer) to continue.
Next, you will be prompted to agree to receive all digitally available government documents, including registered mail, exclusively via e-Box Enterprise. Check the box if you consent. This choice is highly recommended and irreversible.

If you do not wish to work fully digitally at this time, click the Pass button (Passer). You can always opt in later, by clicking e-Box Management (Gestion e-Box) in the top menu and clicking the consent button there.
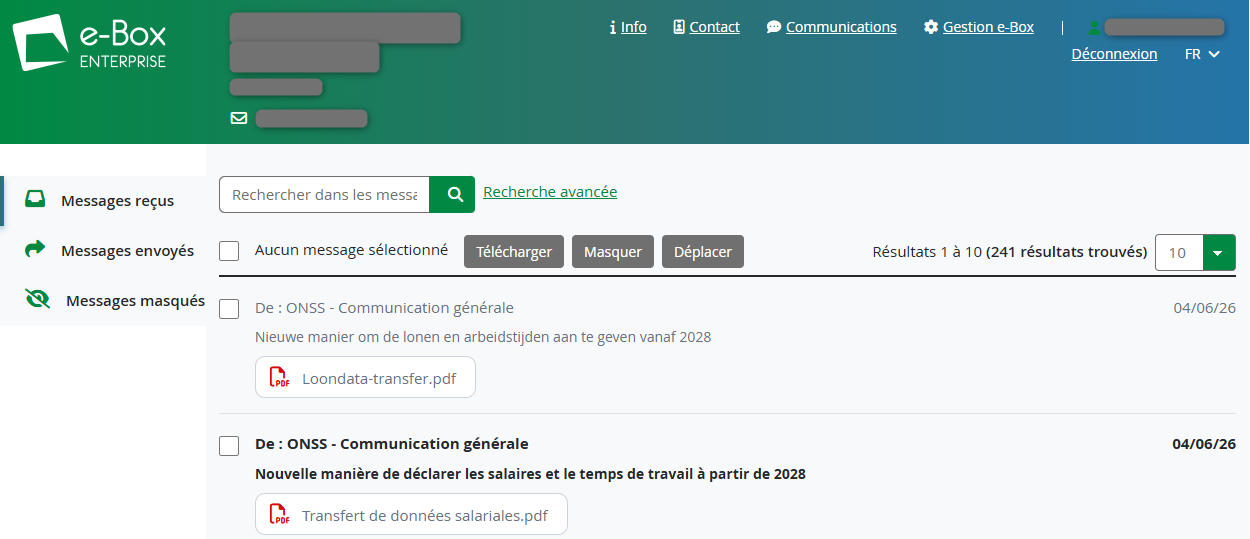
In the top menu of the e-Box home screen, the details of your business are displayed on the left.

You can see:
- the company name
- the company’s Belgian company number
- the email address on record for the company: this is where you will be notified of new publications in e-Box.
You can adapt the company email address in the e-Box Management (Gestion e-Box) section.

On the right side of the top menu, you can see, from left to right:
- the Info button, leading to the e-Box Enterprise website
- the Contact button, leading to the contact form
- the e-Box Management (Gestion e-Box) button
- your name
- the logout button
- the language switch
- a yellow alert box
The alert box can be clicked open:

Alerts of this type will draw your attention to unread messages or other important items you need to check, such as registered mail you have not yet picked up.
e-Box Management (Gestion e-Box)
The e-Box Management screen presents three functions:
- changing your company’s email address
- indicating that you wish to work fully digitally and receive all digitally available documents in your e-Box.
- Partitions management
Email notifications and changing the company email address
The email address displayed is the address to which e-Box will send its notifications. By default, the email address of the company is used. If no company address was specified, the email address of the Chief Access Manager is used.
Notification emails are sent only if a message was not read on the day of publication in e-Box Enterprise. The notification email is then sent in the night after the day of publication. No notification is sent for messages that were read on the day of publication.
To change the email address for your business, click the little green pencil:

Enter the new email address and click Confirm (Confirmer).

‘Fully digital’ consent form
If you have not immediately consented to receiving all digitally available documents in e-Box Enterprise, you can do so at any time in e-Box Management (Gestion e-Box). Simply click the ‘I accept to go fully digital’ button (J’accepte d’opter pour le tout digital).

Please be aware that this choice cannot be undone: once you have chosen to receive all available documents (including registered mail) digitally, you cannot in future request to be sent paper versions of these documents.
Partition Management
The Access Manager or co-Access Manager can create and manage partitions according to your company’s needs.

To add a partition, click on the Add a partition (Ajouter une partition) button.
Fill in the ‘Ajout de partition’ form, with:
- an identifying label,
- a French translation of the label,
- a Dutch translation of the label, and
- a German translation of the label.
Click on Validate (Valider).

The partition will now appear in your list of partitions.
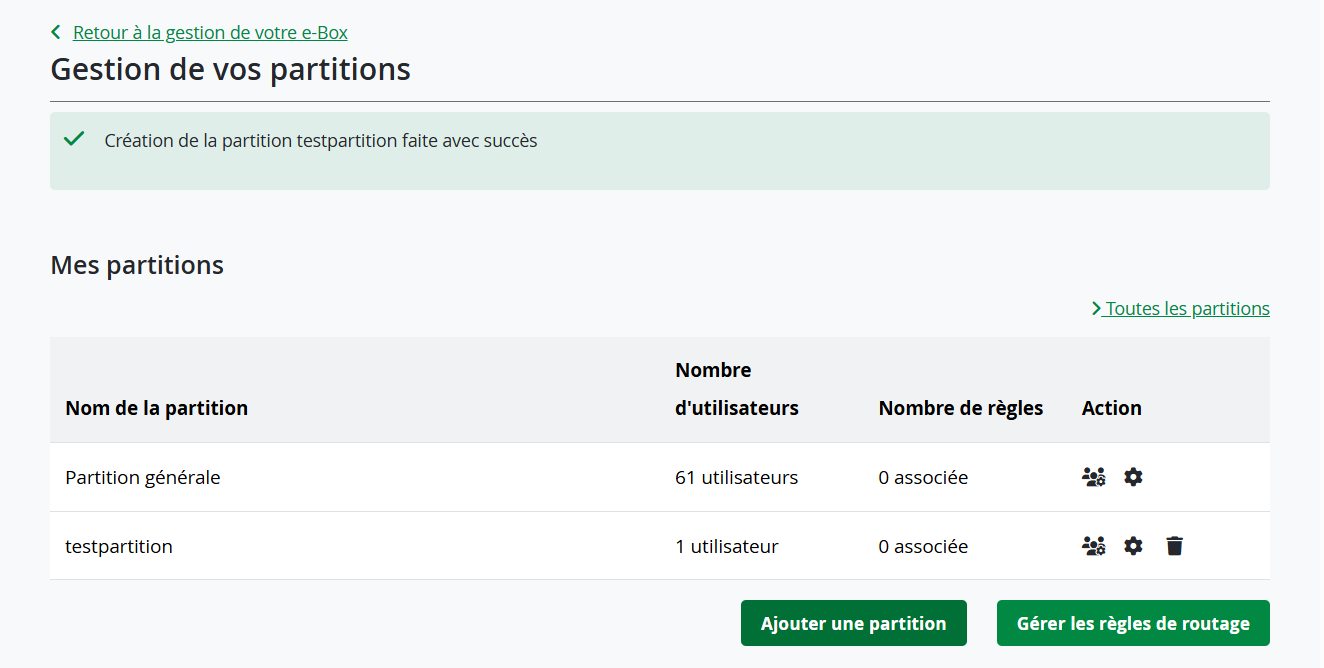
You will need to associate one or more users to each partition through the user management icon under Action.
Click on ‘Gerer vos utilisateurs’ (the ‘people’ icon next to your new partition).

Click on the Add a user (Ajouter un utilisateur) button.

The ‘Adding a user to the partition’ window appears.
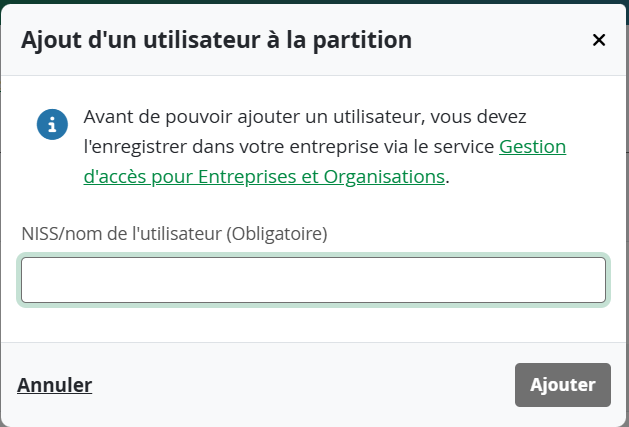
Enter a name in the field, then click on Add (Ajouter).

The new user has been associated to the partition
Managing the routing rules
To manage the routing rules, click the Manage the routing rules (Gérer les règles de routage) button. This will enable you to direct selected messages to the partition you have created.

In the ‘Partition routing rules management’ (Gestion des règles de routage partition) screen, you can create a new rule, or select and then suppress one or more rules.
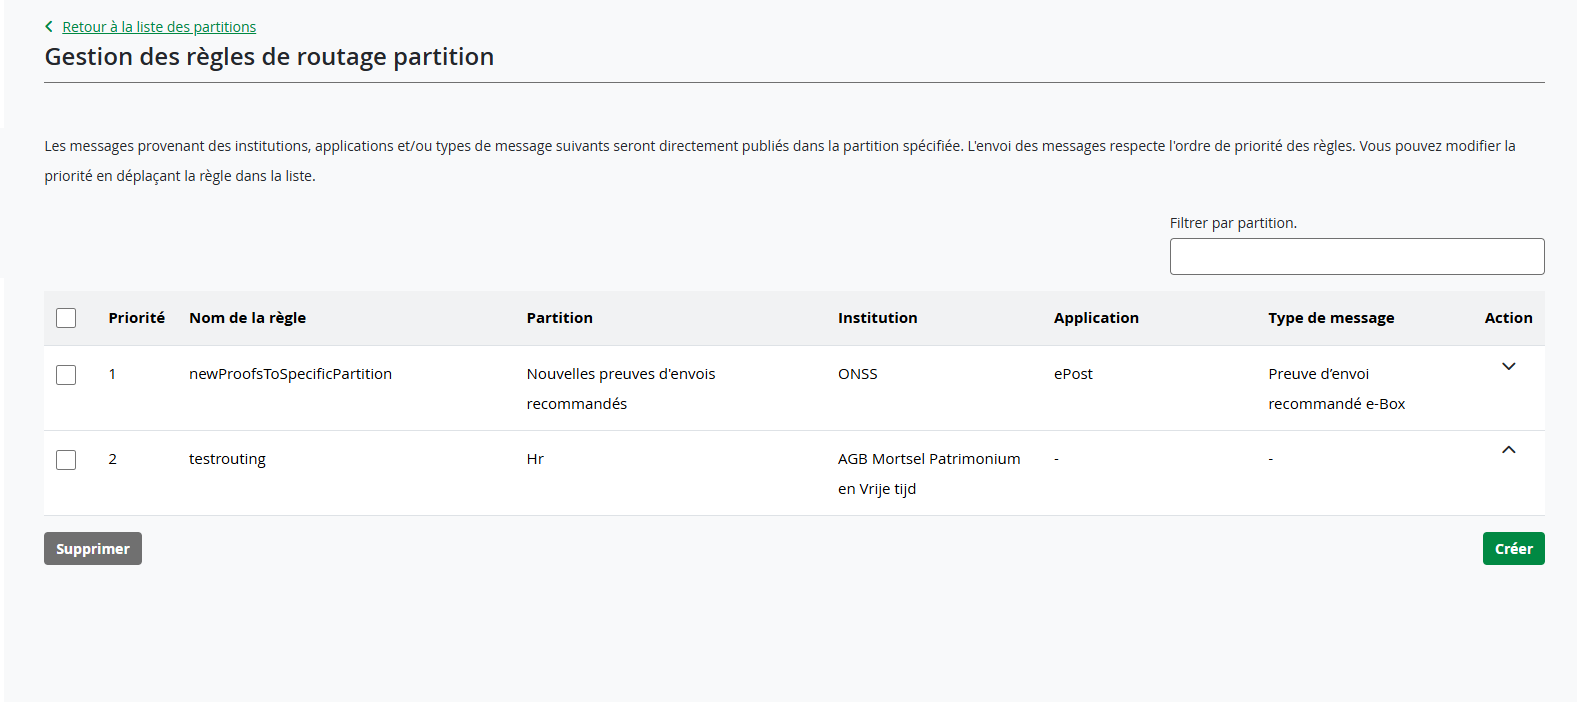
To create a new routing rule, click the Create (Créer) button.

- In the Rule name (Nom de la règle) field, please fill in the name you wish to give to your new rule.
- In the Partition name (Nom de la partition) field, select an existing partition in the drop down list.
- Next, click on Add a criterium (Ajouter un critère).
- Type the first letters of the sender institution for which you want to route the messages and select the institution in the drop down list.
- Type the first letters of the online service for which you want to route the messages, and select the application in the drop down list.
- Click Next (Suivant).

Now select the type of message you want to route from the drop-down list.

Click the message type, then click Confirm (Confirmer). Finally, you can give your new rule a priority, by ticking:
- Add the rule as first priority (Ajouter la règle en première priorité)
- Add the rule as last priority (Ajouter la règle en dernière priorité)
Click on Create (Créer), and your new routing rule has been created. You will receive a confirmation screen.


From now on, the selected message types associated with the selected online services and institutions will automatically be sent to the selected partition.

On the left of the screen, you can see three folders:
- Inbox (Boîte de reception)
- Outbox (Boîte d’envoi)
- Masked messages
Inbox (Boîte de reception)
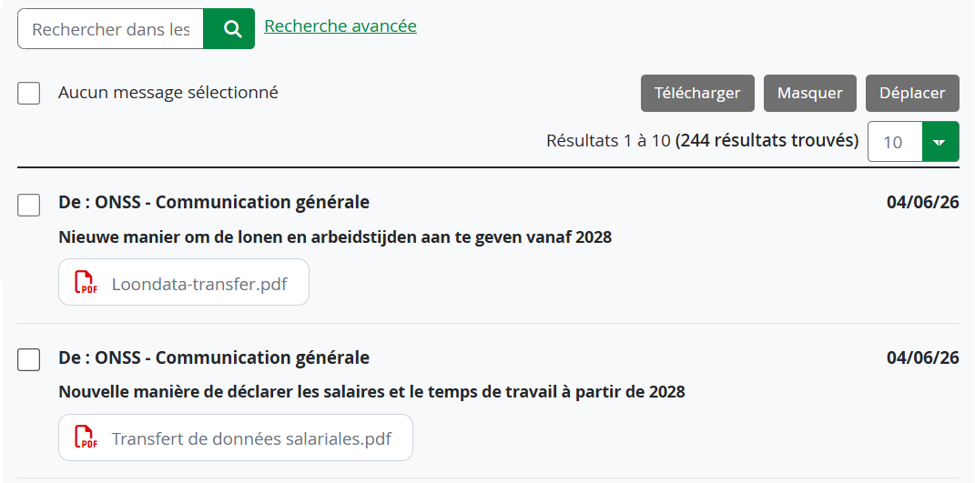
The ‘Boîte de réception’ is your inbox. This is where you find all messages you have not treated yet. Unread messages are shown in bold.
You can change the number of messages displayed on the page using the dropdown menu.

On the right of the message screen, you can find the publication date of the message, and possibly some additional icons indication a special type of message:
 A bold R means that a message is Registered Mail.
 A returning arrow means that a message can be replied to from e-Box Enterprise.
Masking Messages

When you have treated a message, you can remove it from the Inbox and place it in the Masked Messages folder. To do so, select the message by checking the box, and then click the Mask (Masquer) button.
To place a message back in the Inbox, select it in the Masked Messages folder and click Make visible (Rendre visible).

Moving Messages
This functionality allows the user to move messages from one partition to another.
Select a message, then click on Move (Déplacer) to move it from one partition to another.

You will need to select the destination partition from a list of existing partitions for this e-Box. Then click Move (Déplacer).
Each message in e-Box Enterprise has an expiry date. When a message expires, it is automatically deleted from your e-Box, and you can no longer access it. Therefore, please remember to save important documents regularly on your company's storage system.
Expiry date
To see the expiry date, look at the detail of the message. Click the text of the message to see the detail.

Then expand the Technical data (Données techniques). The expiry date (date d’expiration) is displayed there.

Downloading messages
To download a message, click the PDF link and save the PDF.

To download multiple messages at the same time, select them in the message overview and click the Download (Télécharger) button.

Messages shown with a returning arrow symbol  can be replied to directly from e-Box Enterprise.
Click on the message to open its detail page.
 The detail page has a Reply (Répondre) button on the right. Click it to open a reply message.

Enter your telephone number and message, and attach a file (Ajouter un document) if needed. Click Send (Envoyer) if the message is ready, or click Cancel (Annuler).

Funded by the European Union – NextGenerationEU. Views and opinions expressed are however those of the author(s) only and do not necessarily reflect those of the European Union or European Commission. Neither the European Union nor the European Commission can be held responsible for them.
National Social Security Office (NSSO)
- Address: Place Victor Horta, 11 - 1060 Brussels
- Telephone: +32 (0)2 509 59 59
- Website: www.onss.be (in french)
You can also get in touch via our Contact page.


